Freelancers would agree that getting feedback on their designs is one of the most agonizing parts of the design process!
And collaborating with remote clients who are not techno-friendly adds a whole new level to the stress, doesn’t it?
But how do we solve this problem? Is there a way out? Well, it’s time to bid adieu to those lengthy email threads! Let’s adopt the smart way.
In this article, I’m going to reveal the Best Design Feedback Tools for Freelancers and Designers!
The design process has evolved to a great extent in the past few years. We have hundreds of tools to aid us in every stage of designing. And today, we will focus on the feedback and collaboration process in particular.
In this article, we will discuss in depth about the client’s expectations from a freelancer, general mistakes to avoid while sending files to your clients, the need of feedback tools, and 8 Best Design Feedback tools that you can use for your work!
P.S. There’s a bonus tool at the end of this article, so make sure you don’t miss out on that!
Ready for the fun to begin? Let’s dive right into our article!
- What Does the Client Want From You?
- Important Points to Consider While Sending Images
- What are Design Feedback Tools?
- Why Should You Use Design Feedback Tools?
- Best Design Feedback Tools
- 1. Hightail – Best Free Design Feedback tool
- 2. Conceptboard – For WhiteBoard
- 3. InVision – Most Popular Image Feedback & Collab Tool
- 4. pCloud – For Sending Zip Files
- 5. Tresorit Send – For Sensitive Files
- 6. Ziflow – Best tool in Budget
- 7. Notism – Easy to Use Tool
- 8. ReviewStudio Pro+ – Best for all Freelancers
- 9. Frame.io – Best Video Feedback Tool
- Conclusion
What Does the Client Want From You?
As a designer, the first thing that you need to understand is your client’s demands from you.

Because we are specifically focusing on graphics and image designing, your client might want any or all of the following from you.
- High quality of images
- Images in all relevant formats
- Easily downloadable files
- Security when transferring sensitive files
- An easy system of suggesting precisely where changes are required
- Not requiring to register on multiple websites (for non tech-friendly clients)
Important Points to Consider While Sending Images
Whenever sharing images with your clients, always make sure to avoid these basic mistakes. It would not only save your time but also create a positive impression on your client!
Image Formats
Always share images in relevant formats. For example, when designing a thumbnail or a logo, use PNG format.
File Permissions
Always set proper permissions for the clients. For example, if you want the client to be able to download images, then Enable downloads.
Compressed Files
Instead of sending multiple individual files taking up a lot of space, a smarter option would be to ZIP them together and then transfer them.
What are Design Feedback Tools?
As is clear from the name itself, Design Feedback and Collaboration tools help freelancers get concise user feedback.

These are interactive tools that help clients easily review your designs by leaving helpful comments and using interesting annotations like shapes, lines, pen tool, notes, etc.
They also bring together teammates and clients belonging to different geographical locations to collaborate on their designs.
Why Should You Use Design Feedback Tools?
There are many ways how Design Feedback and Collaboration tools can simplify your workflows and your life in general! Let’s check out the most important ones.
They Save Time and Enhance Productivity
We all know how time consuming those long email threads and video calls can be! Design Feedback tools save you hours by simplifying the review process. This way, you can totally focus on your designing process.
They are Easy to Use
Almost all design feedback and collaboration tools are browser based and work online. This is quite helpful for non-technical clients to get started with no troubles!
They Minimize the Need for Extra Tools
Typically, freelancers use specific apps for different stages of the design process.
Google Drive for sending images, Gmail for taking feedback, Zoom for discussing how to implement the changes, and finally, Google Drive for sending the updated designs. Sounds familiar?
Design Collaboration tools double up as cloud storage and sometimes even video calling software, so you won’t ever need to switch to another tool for your entire reviewing process!
They Offer Interactive Feedback Options
All Design Feedback tools offer basic annotation options so your client can use shapes, lines, arrows, or scribble directly on top of the design.
This helps to indicate where the changes are required with precision. Some tools even offer Feedback buttons for Client Approval and File Versioning for more efficient feedback.
They Help in Effective Team Management
This is true for design collaboration tools. They allow team members and clients to initiate real time communication, ensuring everyone stays on the same page!
Now that we know why design feedback tools are important, let’s jump onto the interesting part.
Here’s a list of the 8 best design feedback and collaboration tools that I have thoroughly used and tested in the past few weeks. Let’s jump right in!
Best Design Feedback Tools
1. Hightail – Best Free Design Feedback tool
Hightail is a file sharing and feedback collection tool founded back in 2004.
It offers an easy-to-use free plan loaded with interesting features like file sharing, team collaboration, project management, and more!
If you want to get feedback from your clients on a variety of formats ranging from audios, videos, graphics, documents, or presentations, then Hightail would be a perfect fit for the job.
What can you do in the free version of Hightail?
The free plan of Hightail is best for sharing small files. You get 2 GB of cloud storage space where you can upload a file of maximum 100 MB at a time.
Hightail tool is divided into two parts.
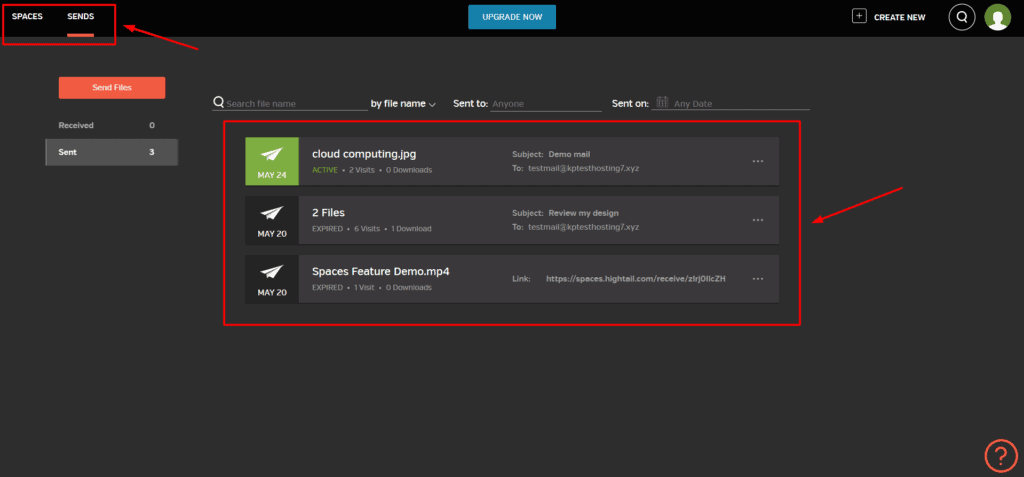
- The Spaces Tab lets you upload your files and manage them in one space.
- The Sends Tab lets you send extensive files to your clients for getting feedback.
You are free to create unlimited Spaces on the free plan, as long as the total storage is under 2 GB.
Hightail is a versatile tool that supports images, audios, videos, documents, presentations, PSD files, and AutoCAD files.
It even integrates with popular cloud storage services like Google Drive, OneDrive, Dropbox, and OpenText Core for ease of access.
How To Use Hightail for sending feedback?
It’s a pretty straightforward process with Hightail.
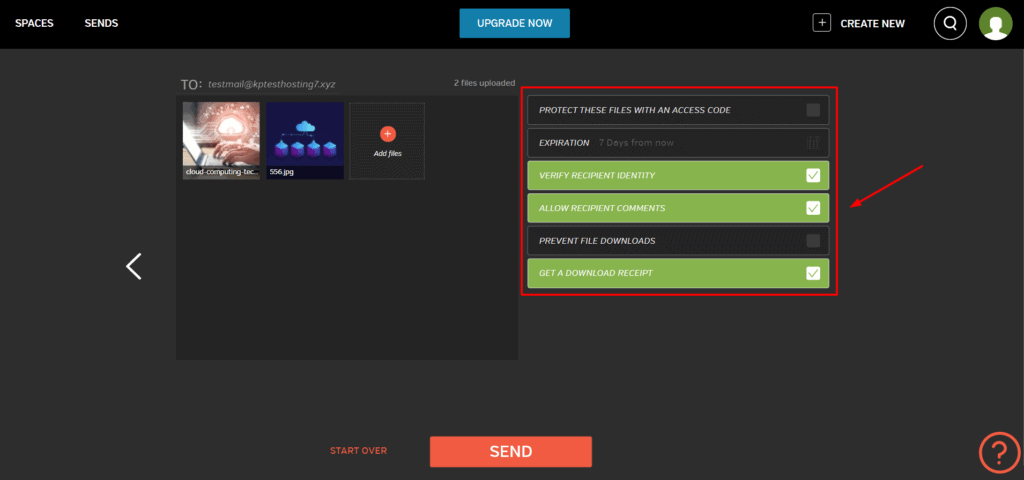
- First, create a Space and upload all the files that you want in it.
- Click on the Send button and select ‘Send via link’.
- You will get a public link that you can share with your client.
- Finally, you can set additional permissions so your client can leave comments on your design.
Now, talking about the feedback process, the client can create an account and leave comments on the designs exactly where he wants the changes to be made.
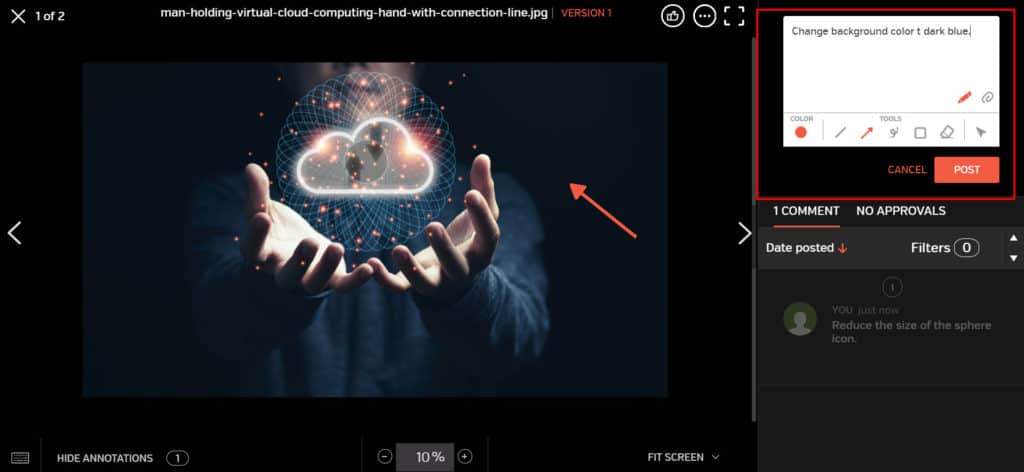
Hightail offers a decent annotation tool in its dashboard. So they can make use of lines, rectangles, arrows, or even scribble on the design using the pen tool. Files can be attached in the comment box and the annotation color can be edited too!
Alternatively, if you only want to use Hightail for sharing files, you can use their Sends tab to do so. It supports dozens of file formats from documents to images, videos, Photoshop files, and even presentations!
Pros of Hightail
- They have a feature-rich free plan.
- You can upload files up to 100 MB in size at a time.
- Shared links have a default expiry of 7 days. This is good for sharing files that you want to be accessible only for a specific time.
- Link Statistics help you keep a track on the number of average comments, active followers, views, versions created, total files uploaded, etc.
- It also lets you tinker with additional settings like: Allow/prevent comments, file downloads, user verification, etc.
Cons of Hightail
- You cannot manage user permissions on the free plan.
- Version History feature isn’t available.
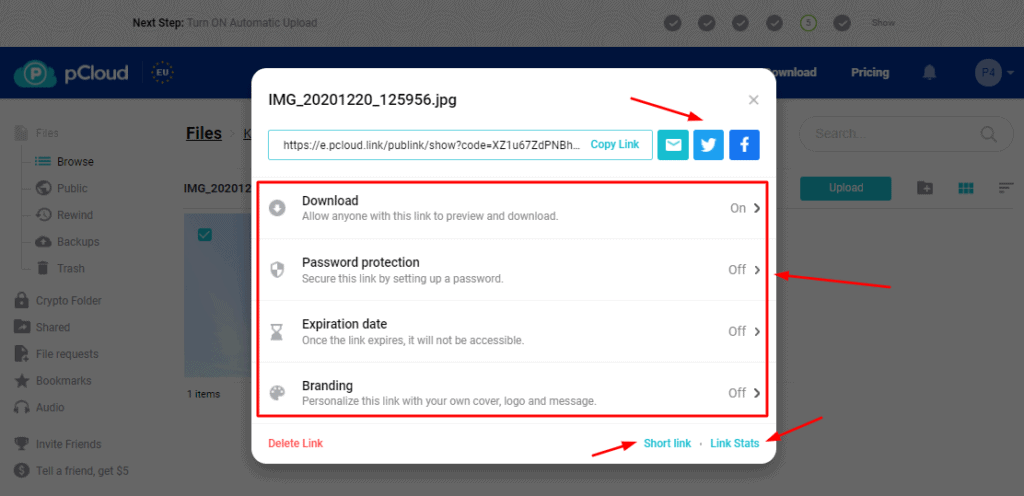
- A link will be generated for your upload file.
- Enable or disable download and preview permissions for the receiver.
- Protect your links with a secure password and set an expiry date!
- Now, you can share your file link with your client through email, Facebook, or Twitter.
- Or you can just copy the public link and send it through any other platform.
2. Conceptboard – For WhiteBoard
Conceptboard is an online whiteboard tool launched in 2010.
It’s an innovative tool that can be used for collaborating and conducting brainstorming sessions with your clients. It is suitable for large creative teams!
What can you do in the free version of Conceptboard?
The free plan of Conceptboard lets you collaborate on unlimited boards with up to 50 collaborators at a time.
It supports a lot of file formats like images, videos, audios, documents, etc and integrates with cloud storage services like Google Drive, Dropbox, and Box.
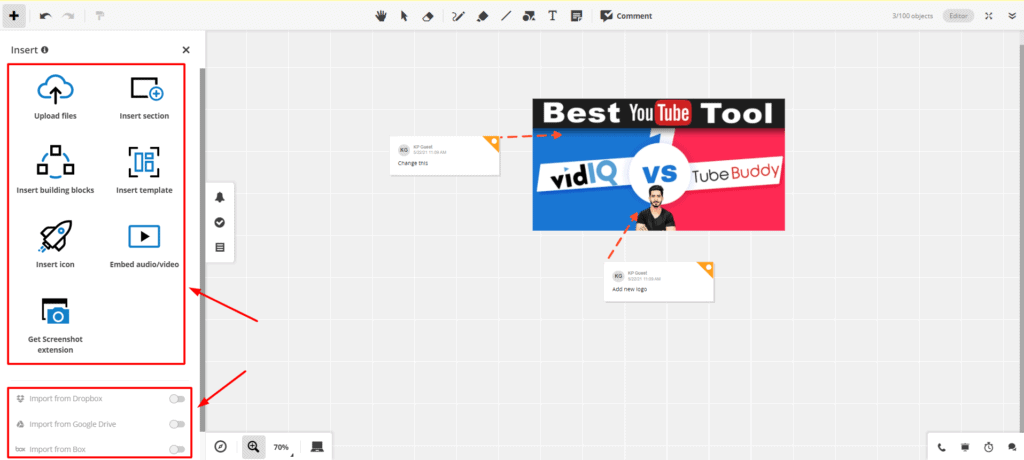
The whiteboard also lets you add a lot of additional tools like:
- Sections in a particular dimension or a Mockup.
- Building blocks like pre-designed tables, flowcharts, grids, sticky notes, etc.
- 90+ Templates like Creative Brief, Feedback Grid, Weekly Calendar, Venn Diagram, To-do list, etc.
- Icons from 15+ icon packs.
- Conceptboard Screenshot extension for capturing the entire screen.
However, the only downside of this tool is that it only has a storage space of 500 MB and supports maximum file upload up to 10 MB!
How to use Conceptboard to give feedback?
Giving feedback is a cakewalk with Conceptboard!
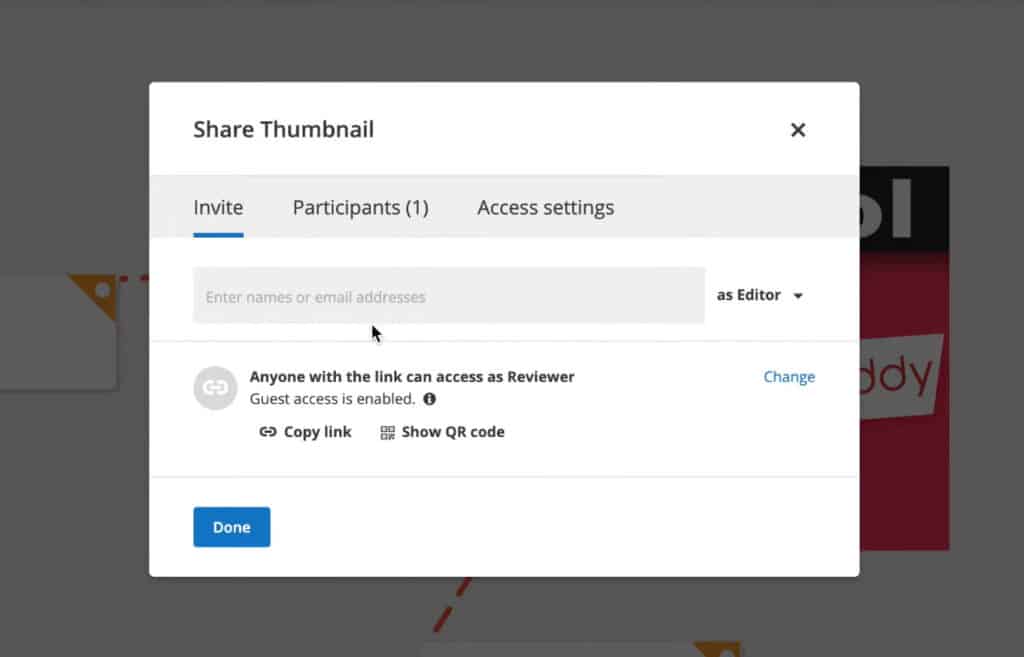
- You upload your files on the whiteboard.
- You share the generated public link or QR code with your client.
The best part is that the client does not need to create an account in order to submit his feedback. They can either sign in or enter through guest access.
For guest access, they only need to provide their name and start collaborating with you in real-time. This saves a lot of time and effort!
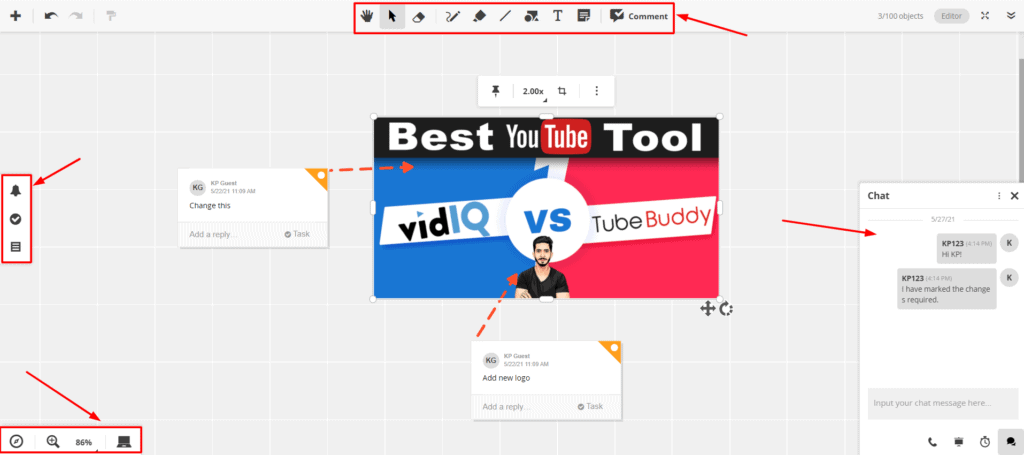
Conceptboard wins with its variety of annotations. The client can add text, shapes, arrows, lines, scribble, highlight, or add sticky notes beside your design!
Pros of ConceptBoard
- You can collaborate with other designers using Conceptboard as well.
- Lots of pre-made templates and sections can be inserted and edited directly.
- Their free plan looks really rewarding and it would get most of your work done.
- The board can be exported as a PDF or an image file after the collaboration is done.
- You can connect cloud storage services like Google Drive, Box and Dropbox with your Conceptboard account.
Cons of Conceptboard
- The Free plan doesn’t support file versioning.
- The free plan is limited to 500 MB storage space, which is quite low!
- Non-technical clients might face some difficulty in understanding the features at first.
To get rid of these two limitations, you can upgrade to its affordable Premium plan priced at $6/month when billed annually! It offers you unlimited boards and projects, along with 20 GB of storage space!
You can upload files up to 25 MB in size and also view the version history. Not just that, it also supports audio calls, video calls, and screen sharing with your teammates for an effective collaboration session.
3. InVision – Most Popular Image Feedback & Collab Tool
InVision is a popular design collaboration and visual feedback tool launched in 2011.
It is used by over 7 million people around the world today! You can use InVision to get customer feedback specifically on your image files.
What can you do in the free version of InVision?
InVision offers a free plan where you can create a maximum of 3 prototypes, unlimited public spaces, and freehands. It lets you create a maximum of 5 documents. However, an infinite number of images can be added within each document! It also supports 10 active users at a time.
The free plan offers storage space of 10 GB and allows you to upload files up to 10 MB in size in JPEG, PNG, and GIF formats. These files can then be shared with clients for getting reviews.
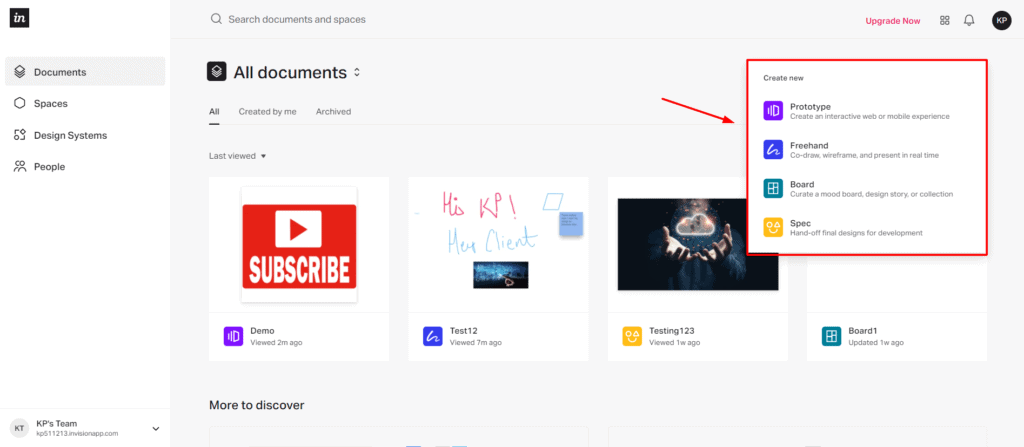
But that’s not all! You can also use InVision’s:
- Boards feature to discuss new ideas and collaborate on boards.
- Freehand tool to conduct brainstorming sessions with clients and project managers in real time.
- Craft plugin to integrate Photoshop and Sketch apps and directly send your design file to InVision.
How to use InVision for sending feedback?
Sending feedback through the InVision app is quite easy. All you need to do from your end is:
- Create a new Prototype.
- Upload images that need to be reviewed.
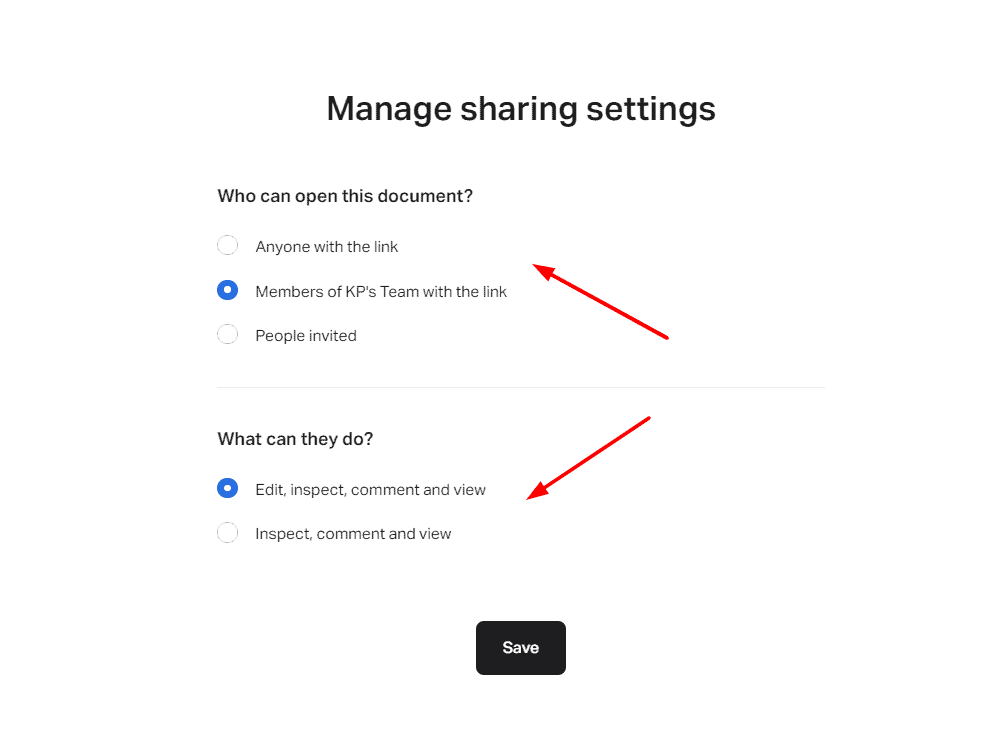
- Share the document by sending a public link or invite the client through email.
- You can add your clients as team members and give them edit/review permissions.
The client can then sign up for a free account on InVision and leave helpful comments on your design.
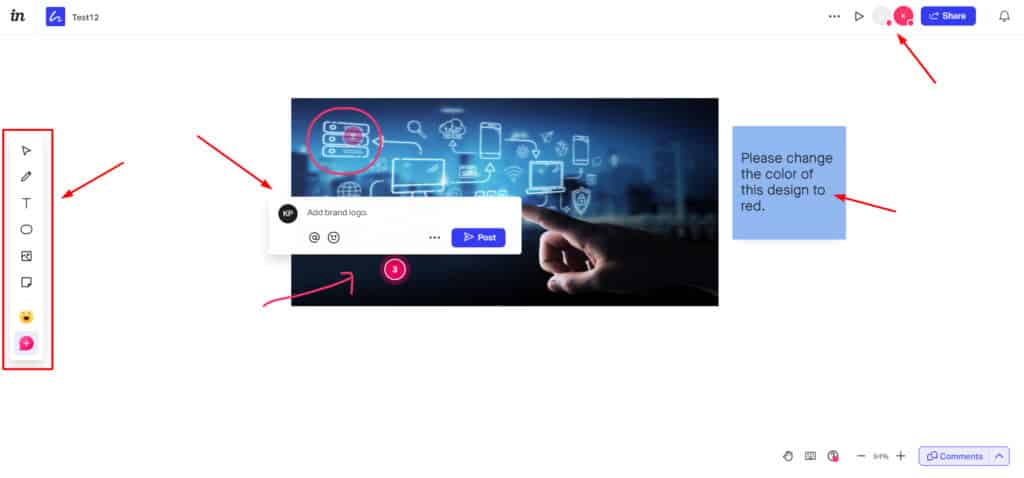
If they also need to add annotations on the design, you can use the Freehand tool. It lets users add text, scribble, add shapes, reaction emojis, images, etc.
Pros of InVision
- A decent 10 GB of cloud storage.
- You can add up to 10 users on your account.
- Version History to check previous versions of the file.
- Plugins for integration with Photoshop and Sketch apps.
- Unlimited screens (images) allowed within each document.
- A powerful and unlimited freehand tool with interesting annotation options.
- Supports Prototyping, so you can create interactive user interfaces for mobile and desktop apps using their pre-designed wireframes.
Cons of InVision
- Limited documents (5) on the free plan
- Client registration is required for giving feedback
- No annotations available on the feedback widget
4. pCloud – For Sending Zip Files
Not all services let you send zip files. You can either use the traditional method of using Gmail for shorter zip files and Google Drive for the extensive ones. However, if you want to upload files over 15 GB, it’s best to use a cloud storage service.
pCloud is one of the most popular cloud storage providers in the market right now! It has an enormous user base of over 10 million users around the globe!
pCloud offers both free and paid cloud storage options. With its free account, you get a decent 10 GB of cloud space along with swift upload and download speeds, some of the best file sharing features, and enhanced security!
If you want to transfer PSD files, RAW files, or ZIP files to your clients with advanced security and speed, pCloud would be a suitable option.
However, if 10 GB space is not enough for your needs, you can also look at their paid plans. They offer a huge 2TB cloud space for $9.99/month, which I think is quite affordable!
How to use pCloud for sending ZIP files?
pCloud is available for all devices including mobiles, desktop, and even as web version. So, you can sign up for a free account and then follow these easy steps.
- Upload your ZIP file on your cloud vault.
- Click on the Share button.
However, if you don’t use a cloud storage frequently, you can check out pCloud Transfer, a free file transfer service offered by pCloud that lets you transfer up to 5 GB of files at a time.
Pros of pCloud
- It lets you upload large files on the cloud vault.
- It offers super-fast upload and download speeds.
- Link Statistics help you keep track of your shared links.
- Advanced sharing functionality lets you manage permissions.
- Branding Pages lets you set custom logos and images on your shared files page.
Cons of pCloud
- Charges extra for add-ons like Extended File History and pCloud Crypto.
5. Tresorit Send – For Sensitive Files
Tresorit Send is a free file transfer service offered by the renowned cloud storage provider – Tresorit. It mainly focuses on security while transferring files online. So, if you need to send some confidential files where encryption is required, this file transfer service can be a great option.

What makes it stand out is that you don’t need to sign up on Tresorit in order to send files! It lets you transfer gigantic files upto 5 GB in size at a time! Crazy, isn’t it?
If you are a designer who needs to share large and sensitive design files with your clients, then Tresorit Send is the service you should be using.
How to use Tresorit for transferring sensitive files?
With Tresorit Send, there is absolutely no hassle of creating accounts. You can transfer your confidential files to your clients with the snap of a finger! Let’s check out how.
- First, visit send.tresorit.com and drag and drop all your files (maximum 100 files and 5 GB in total) on the dashboard.
- Next, enter your email address.
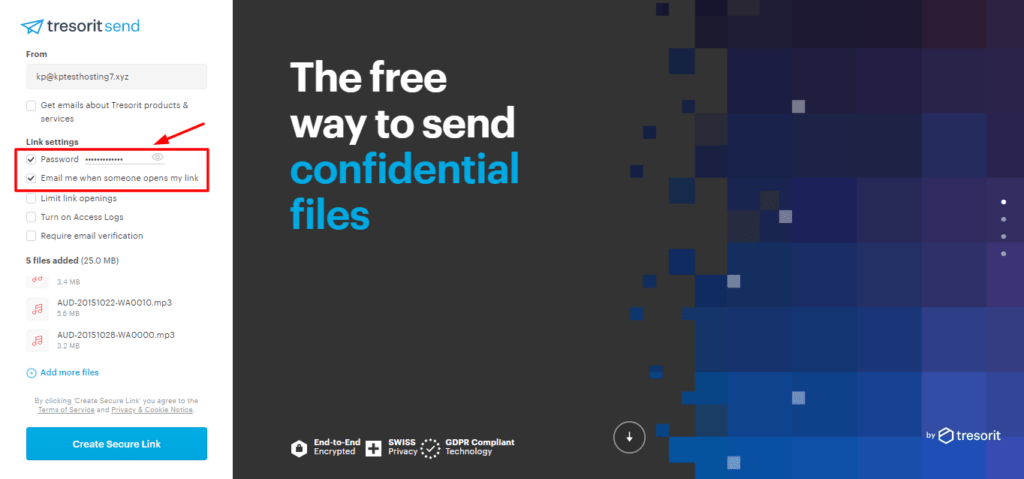
- Set a secure password to prevent third parties from snooping on your data.
- Now, click on ‘Create a secure link’ and your files will be uploaded.
- Once the process is complete, you get a link that can be shared through email or other platforms.
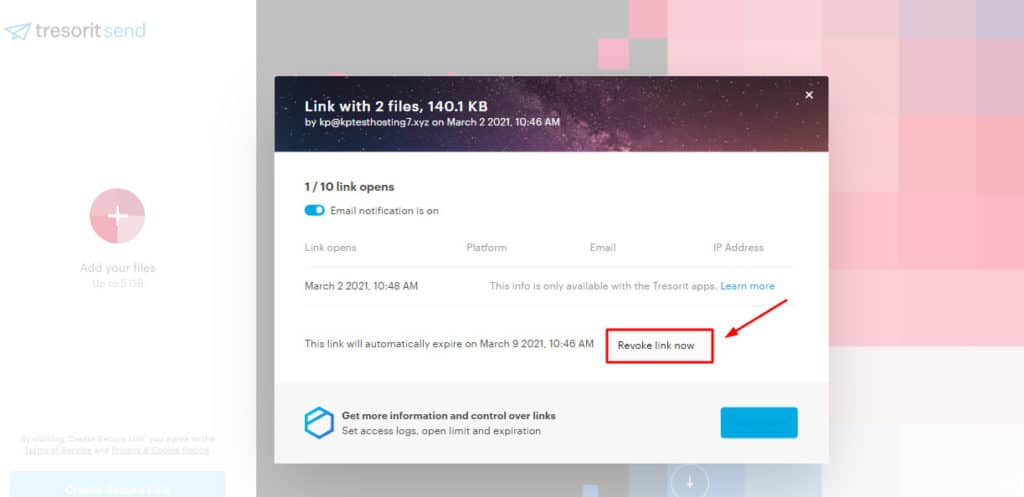
- You will also receive an email comprising a link to the admin page. You can check the link expiry date, the number of times your file was viewed and an easy ‘Revoke Access’ button to stop sharing your files right away!
(Check out my article for the step-by-step guide to transferring files through Tresorit Send!)
Pros of Tresorit
- It lets you secure your shared links with a strong password.
- It lets you check the link expiry date and time and revoke access to any shared link.
- Use of Zero Knowledge Encryption ensures nobody has access to your data except you.
- You can view advanced link analytics like the number of times your files have been opened and downloaded, along with date and time.
Cons of Tresorit
- Tresorit Send is a zero knowledge service, which is why its speeds are slow.
- You can only upload upto 100 files adding up to 5 GB in total.
- You can only the download shared links 10 times.
6. Ziflow – Best tool in Budget
Ziflow is an online proofing software launched in the year 2015.
When you register for Ziflow, you are assigned a sub domain under their primary domain. (E.g. kripesh.ziflow.com)
They have priced it at an affordable rate of $9/month, where you get 25 proofs/month and 5 GB of storage space.
Apart from supporting unlimited reviewers on your designs, it supports many files including images, docs, videos, audios, and URLs under a single review.
I personally found Ziflow to be a very effective website feedback tool!
How to use Ziflow to give feedback?
If you wish to take feedback on your creative projects, follow this process:
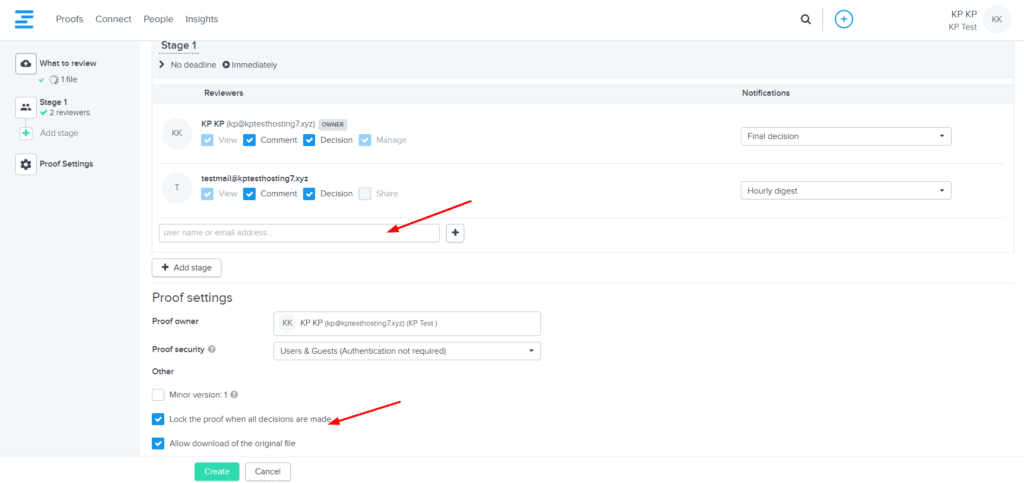
- Create a new proof (project).
- Upload all the files you want.
- Add a reviewer’s email.
- Enable/disable review deadline, file downloads, client verification, etc.
I found the user interface of Ziflow to be a bit complex for beginners to understand.
Ziflow doesn’t require the clients to register for leaving feedback if you add them as guests on your account.
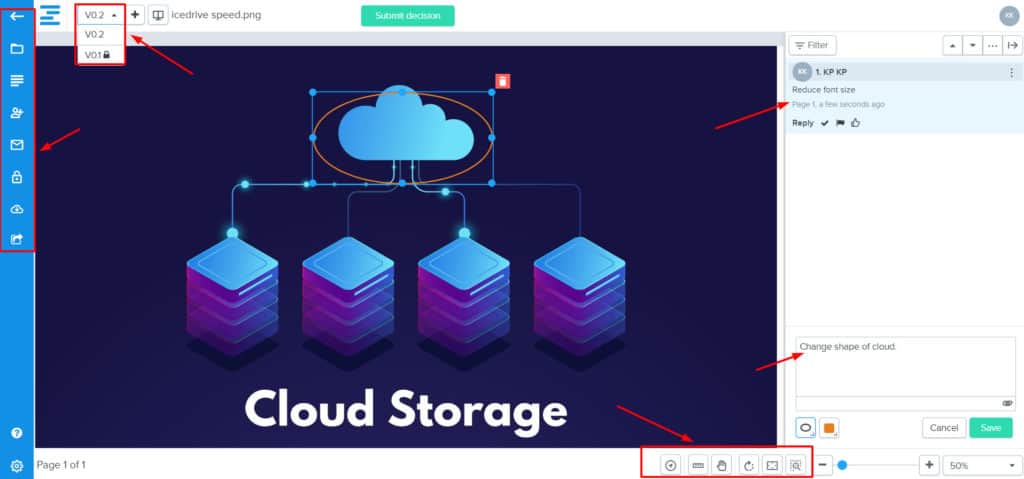
After receiving an email link, the client can browse through different versions of the file, leave comments on your designs, add text, lines, arrows, shapes, scribble, change annotation color, and even attach files in the comments!
Finally, after suggesting all the changes, they can choose an appropriate status from the Design Status buttons and submit the feedback.
Pros of Ziflow
- It supports hundreds of file formats including documents, images, videos, audios, and webpages.
- Design Status buttons help in specifying the current stage of the design.
- You can connect Cloud Storage services like Google Drive and Dropbox with your Ziflow account.
- Clients can easily view previous versions of the design and check how changes have been implemented.
- Auto Compare feature lets you compare two versions of a file side by side.
- It is a good paid design feedback tool in budget.
Cons of Ziflow
- You cannot create public links. You need to send your designs to the client’s email for feedback.
- Its interface loaded with a variety of options can be complex and overwhelming for beginners.
As promised in the beginning of this article, I have a bonus tool for you!
7. Notism – Easy to Use Tool
Notism is a Design and Video Collaboration tool founded in 2013. It is one of the easiest tools with a friendly interface even for beginners.
As a freelancer, you can use Notism for collecting more concise feedback on your designs and videos from clients.
Notism’s Design Feedback tool is priced at $20.40/month, where you get 15 design projects per month and a maximum of 15 collaborators which is good for small design teams!
Whereas, they have priced their Video Feedback tool at $23.80/month. It allows 10 video projects per month with 10 collaborators. This is great if you are a freelance video editor.
Both the versions offer 20 GB of cloud storage space which is again, quite good for image files and decent for uploading videos.
How to use Notism for sending feedback?
Notism is by far the simplest design feedback tool! All you need to do is:
- Create a new video/design project.
- Upload your files.
- Share the public link with your client.
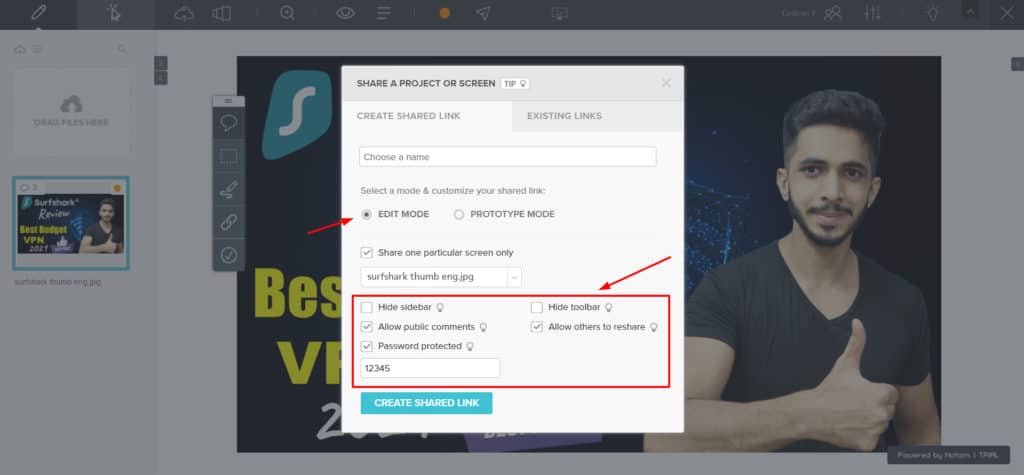
You can also set additional permissions like:
- Share a particular screen.
- Allow the client to comment and reshare.
- Secure links with a password for sensitive files.
But, here’s the best part! The client or stakeholder does not need to sign up for an account. He can enter his name and email and start suggesting changes on your design.
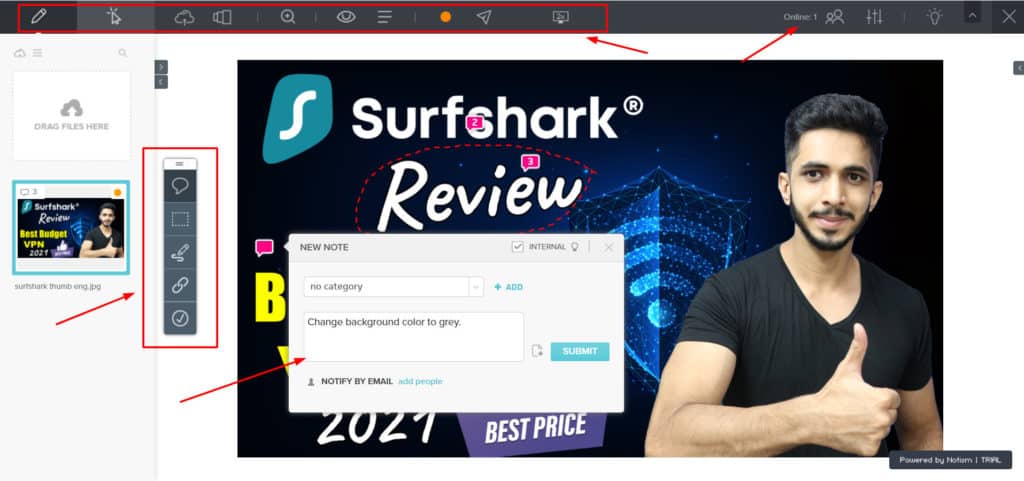
Notism offers good annotation features. So, the client can comment and draw over the design using different colors, adjust thickness and type of line and even add shapes!
Though a Version History option is available, the client can only access it if you add him/her as a member and allow editing permissions on your design project.
Pros of Notism
- Good sharing options
- Easy to use even for beginners
- An impressive 20 GB of storage space
- Clients don’t need to sign in for leaving feedback.
- You can protect your links with strong passwords.
- Design status buttons available for more efficient reviews.
- It is a good option for taking instant feedback on video files.
- Can create and assign to-do lists to designers and other team members.
Cons of Notism
- Clients cannot view Version History without signing up on Notism.
- Only 10 screens in Notism free account.
8. ReviewStudio Pro+ – Best for all Freelancers
ReviewStudio is an online proofing tool founded in 2015.
When you sign up for a ReviewStudio account, you are assigned a sub domain under ReviewStudio. (E.g. kripesh.reviewstudio.com) It is secured with a free SSL certificate.
It supports a variety of files including images, audios, videos, PDFs, HTML files, and website URLs. Because it is specifically designed for taking reviews from clients, ReviewStudio can be an essential upgrade for your workflow as a freelancer!
The Pro+ version is priced at $24/month, where you get unlimited projects and reviews per month. It offers 100 GB of cloud storage space, which is sufficient for all kinds of creative projects.
Though this plan only allows one user, there are no restrictions on the number of guests that can review a design!
ReviewStudio can be a powerful tool for freelancers working and wanting feedback on multiple types of projects including graphic designing, audio and video editing, website designing, etc.
How to use Review Studio Pro+ to give feedback?
You can take feedback on your designs with Review Studio as follows.
- Create a new design review.
- Upload your files.
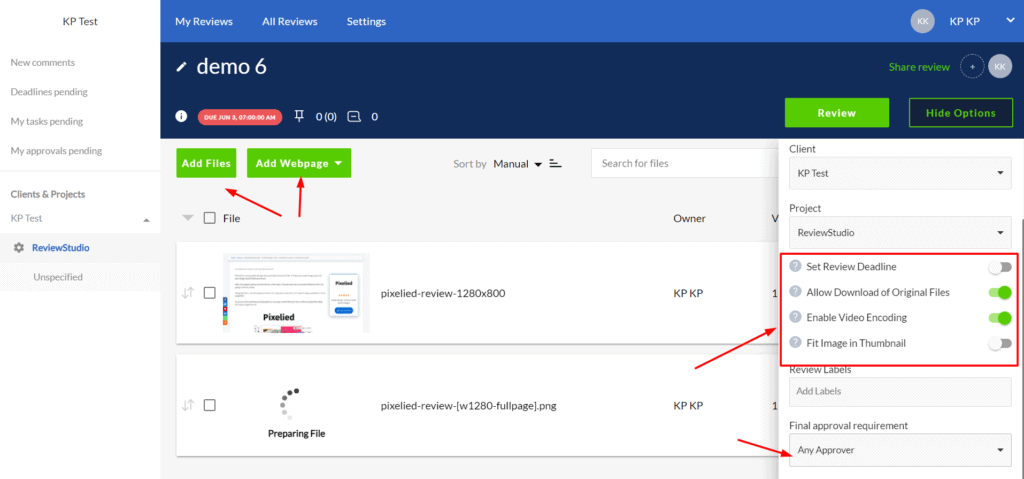
- Share the review by either:
- Inviting specific users to review
- Sending public links to guests
- Set a password to secure your links
- Enable/disable file downloads and additional settings
The client need not register on ReviewStudio to leave feedback. He can use the public link and enter his name, email, and the guest password (if it was specified). Now he can start reviewing your work.
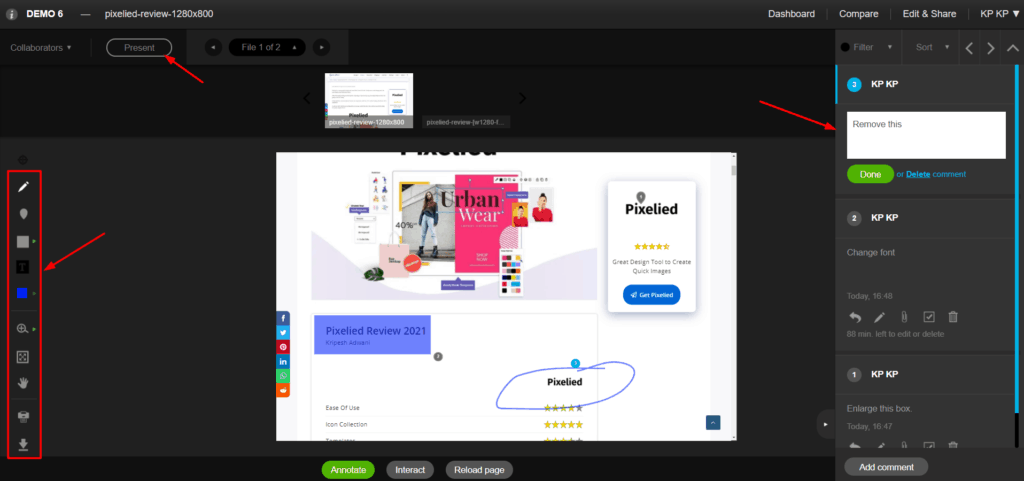
ReviewStudio offers good annotation features. So, the client can use the pen tool to draw over the design, use arrows, shapes, change color, size, and opacity of annotations, and add helpful comments.
He can also add notes, and print or download the design if he wants. With web pages, the reviewer can either annotate or interact with the webpage.
The Interact option would allow him to copy the text or visit the site URL, etc.
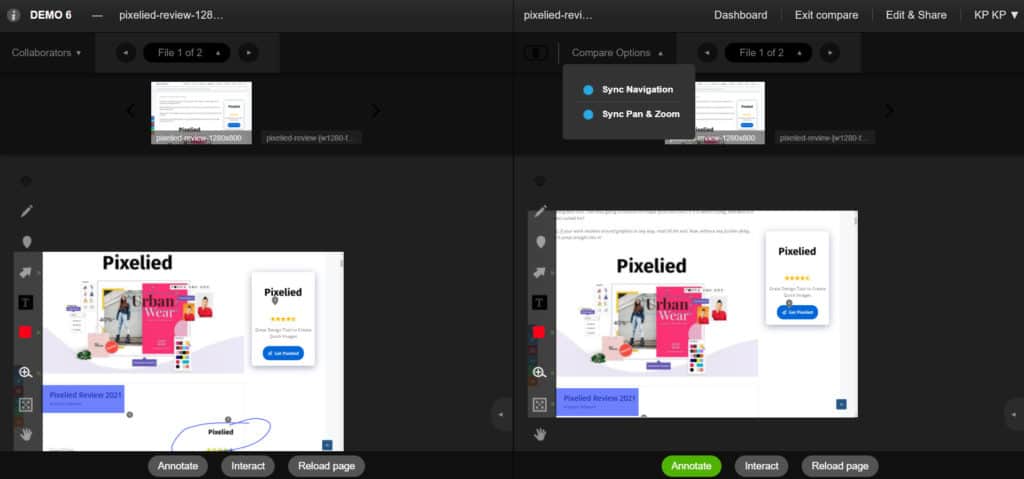
An interesting feature is the Compare button that lets you compare two versions of a file by placing them side by side.
After the review process is complete, ReviewStudio has an approve button on the top of the screen. The client can simply click Yes or No to submit his decision.
Pros of ReviewStudio
- It supports file versioning.
- Helpful for web designers, as it supports Website URLs.
- It lets you set deadlines and enable email reminders for reviewers.
- Lets you compare two versions of a file side by side to track the changes made!
- You can set a link password for enhanced security when inviting a guest reviewer.
- Presentation option lets the designer/client present their screen for a better real-time collaboration.
Cons of ReviewStudio
- The Compare tool doesn’t zoom in well for web pages.
9. Frame.io – Best Video Feedback Tool
Frame.io is an online video collaboration and feedback platform launched in the year 2014.
Its free plan offers you 2 GB of cloud space along with better security and integrations with lots of apps and services. You can add up to 2 users as team members with your free account.
It supports all popular file formats, so you can upload image files, PDFs, audios, and videos for getting feedback.
While sending the review link to your client, you can protect it with a strong passcode and also set a link expiry date, which is really good for security.
But, what I loved the most about Frame.io was its feedback process for videos!
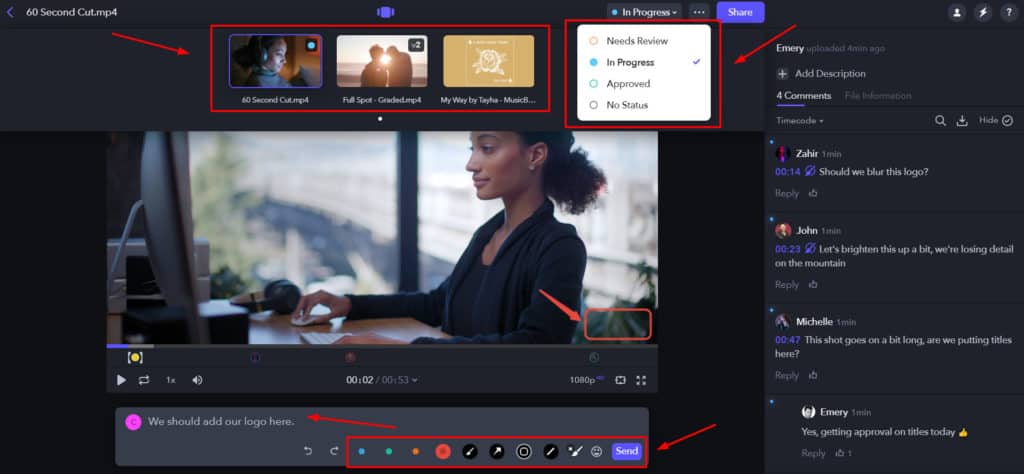
The client can leave comments and annotate the video frame-by-frame with ease! Not just that, he can also check the version history, and choose from different design status buttons to offer better feedback.
I think this platform would be perfect for freelancers wanting reviews on their videos.
Well, I just gave you a short glimpse of Frame.io. If you are interested in trying it out for yourself, you can sign up for a free account here!
Conclusion
Design Feedback and Collaboration tools might not be so popular as of now, but they are certainly going to blow up in the near future!
Not only do they save our time and efforts, but they also simplify the entire process of offering and receiving feedback on our creative projects.
Ultimately, it depends on which tool your client prefers to use. But as a freelancer, you should be well aware of all these tools so that the design feedback process is simplified to a large extent.
Have you used any design tool before? How has your experience been with them? Are you going to try any of the tools discussed in this article? Let me know your opinions in the comments section below.
Also, if you enjoy reading my content, you can join my Newsletter to stay updated with the latest information around digital tools.
This is Kripesh signing off! Stay safe at home and keep learning! Cheers! 🙂
Hi I am very happy to be hear and read yours wonderfull article. Thanks for sharing this kind of wonder full article with us..