Are you planning to start your own website but confused how to get started? Then this article is for you!
In this article, I’m going to show you the step-by-step process of buying a domain name.
Along with this, I’ll also get you covered on the basics regarding domain names, extensions, domain registrars, nameservers and how to point your domain to your hosting account!
In short, If you’ve never purchased a domain, this article would be a perfect guide for you.
So, with no further ado, let’s get started!
What is a Domain Name?
A domain name is the address of your website. People type your domain name in their browsers to reach your site on the Internet.
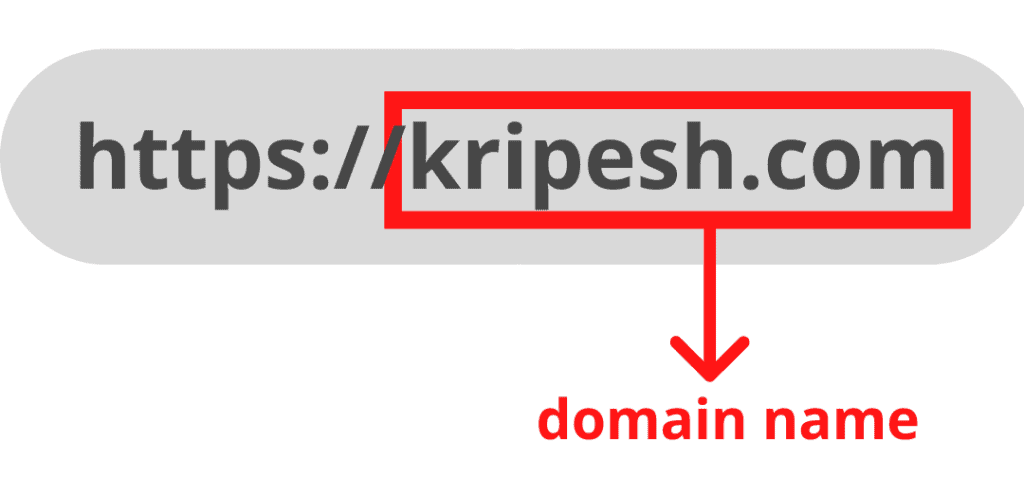
For example, Kripesh.com is the domain name of my website. Domain names make it easier for people to remember your website.
Tips While Choosing a Domain Name
Your domain name is the most important part of your online presence. A wrong name can affect your engagement.
Always ensure to follow these two rules while selecting your perfect domain name.
- Never use numbers, hyphens, or other special characters in your domain name. They are difficult to remember.
- Don’t name your website even remotely similar to the branded companies. Once your website gains popularity, you might have to face legal charges.
I’ll write a more detailed article on tips for a domain name. Stay tuned for that 🙂
What are Domain Extensions?
Domain Extensions are the last part of a domain name used to denote and identify different websites.
Domain extensions, also referred to as Top-Level Domains, are divided into three categories.
1. gTLD (Generic Top-level Domains)
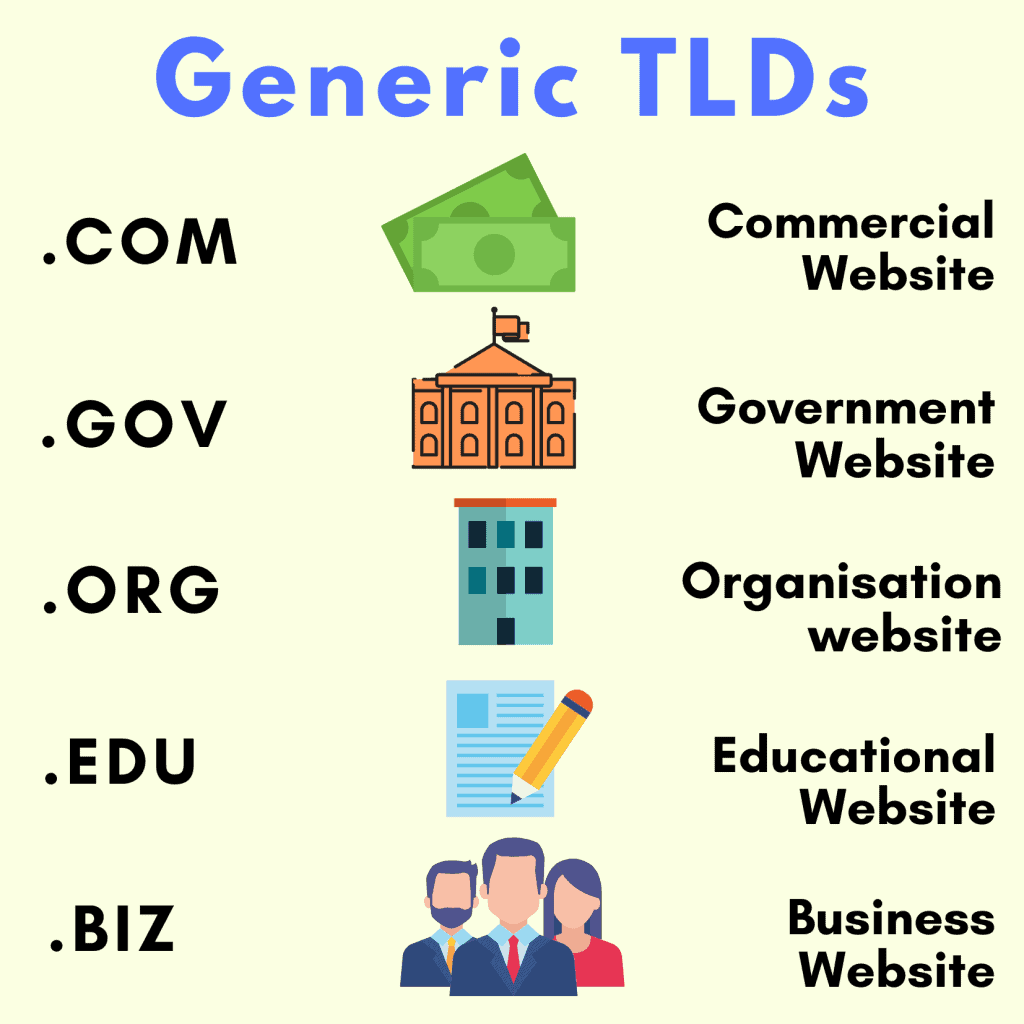
These include popular domain extensions like .com which stands for commercial websites, .gov, for government websites, .edu which is for educational websites, etc.
2. ccTLD (Country Code Top-level Domains)
These domain names end with a two-lettered domain extension targeting the audience of a specific country.
Example
| Extension | Country |
| .in | India |
| .pk | Pakistan |
| .a | Canada |
3. nTLD (New Top-level Domains)
Do you know that there are only 22 registered generic top-level domains?
With thousands of new websites being registered every day, it becomes hard for users to find the domain names of their choice, with these limited extensions.
Therefore, New Top-level Domains came into existence, so that website owners can have more options to find the domains of their choice.
This also helped them differentiate themselves from the ever-growing crowd of millions of websites.
New top-level domains also add a bit of personality to your website. Cool, right?
Some new top-level domains are: .ninja, .tech, .yoga, .music, .pizza, .taxi etc.
New Top-Level Domain Impact on SEO?
In the eyes of Google and other search engines it is same. Using new Top-Level domain extensions won’t have an impact on your page rankings.
What is a Domain Registrar?
Domain Registrars are the companies where you can register your domain names. For example, GoDaddy, Namecheap, BigRock, DynaDot, NameSilo, etc.
The thing with domains is, you cannot ‘buy’ a domain name. When you are purchasing a domain name, you are ‘renting’ it from the domain registrar company for a particular amount of time, say 1 or 2 or 5 years.
Then you need to rent it again. This would cost you a ‘renewal amount’. You cannot have a domain name assigned to yourself for a lifetime.
Okay, now that you all have understood the basics, let us look at how you can purchase your own domain name from a domain registrar.
The process of domain registration is easy. I’ll show you how you can
Register your domain name in less than 10 minutes!
Don’t believe me? Let’s get into the details and you’ll see for yourself!
How To Buy a Domain Name?
For this demonstration, I’m going to purchase a domain – kptesthosting8.xyz from Namecheap.com. Now, follow these steps with me.
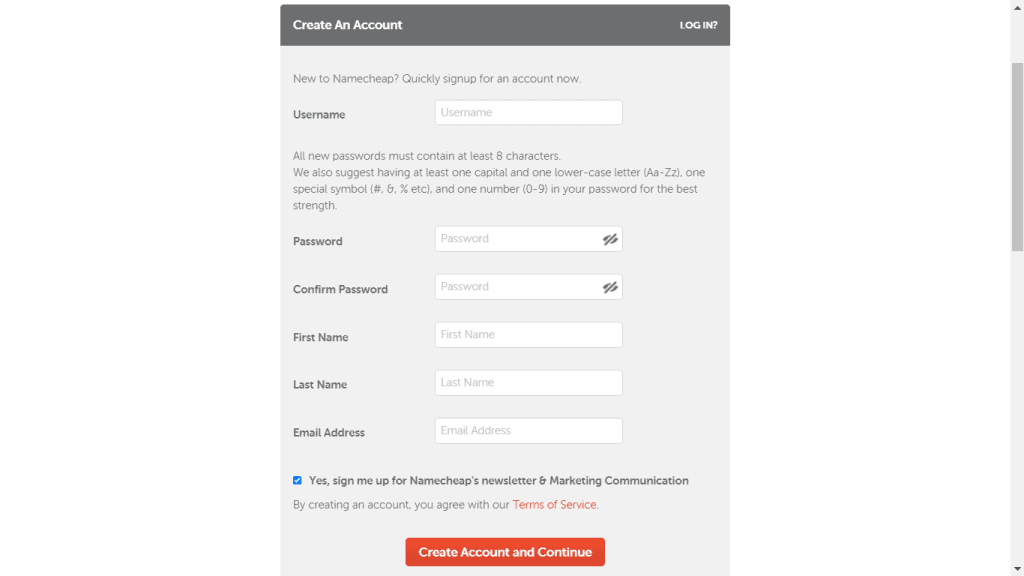
Step 1:
The first step is creating an account on Namecheap. Here, you will only need to fill in your basic details like name, email, username, password, etc.
Step 2:
After your account is created, log in with your credentials.
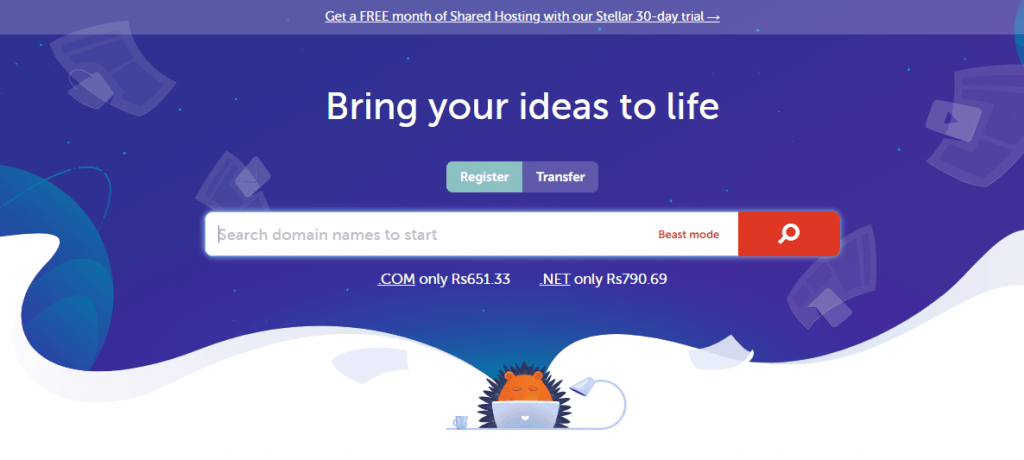
Step 3:
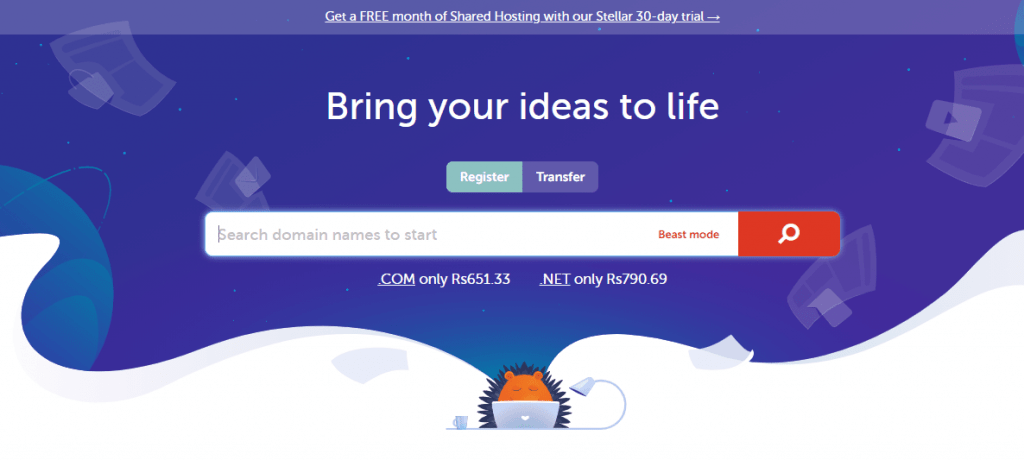
Now, type in your desired domain name in the box and click on the ‘Search’ button. This will show you if the domain you want is available. You can also use domain name generators to find creative ideas for your domain.
Step 4:
If the domain name that you want is available, your screen will resemble the one below. You need to click on ‘Add to Cart’.
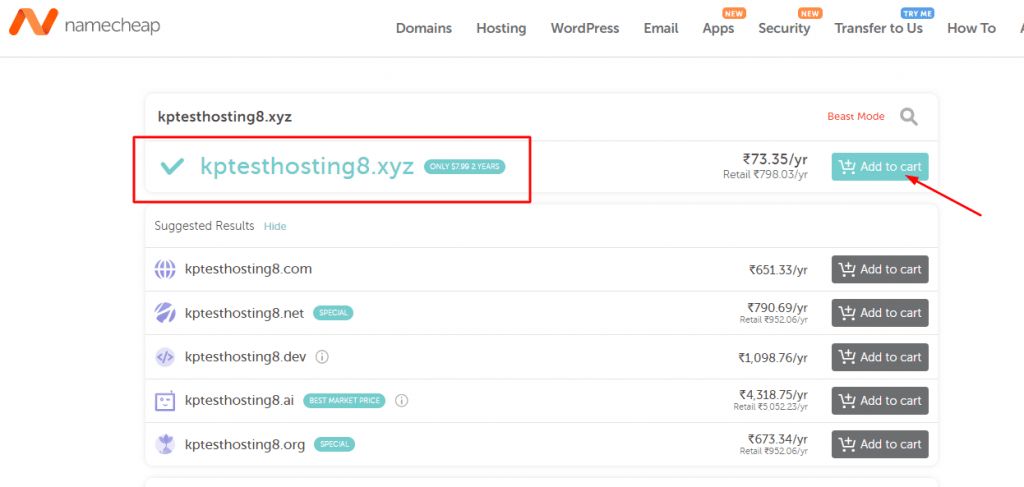
If the domain name is not available, you can:
- Either go for a different domain extension with your chosen domain (like .net, .in, .org, etc).
- Or try out a different domain name and check if that’s available.
When you find your perfect domain name, click ‘Add to Cart’.
Step 5:
Next, you will see a screen like the one below.
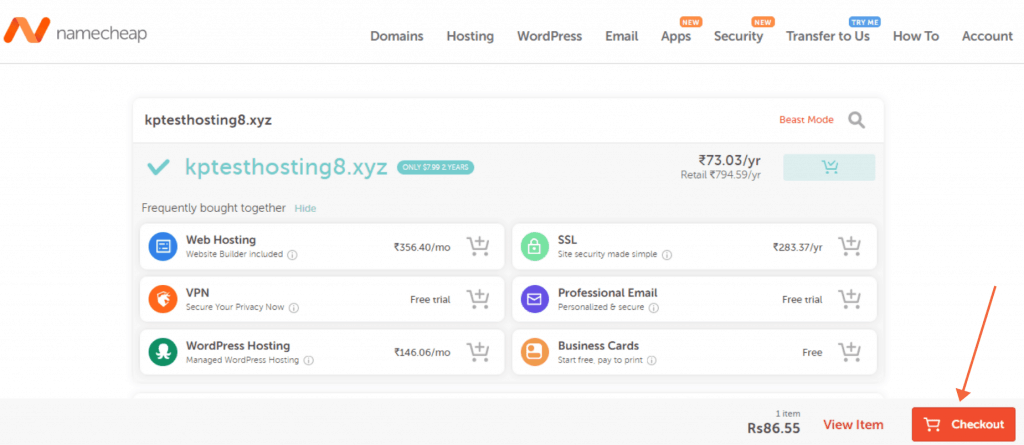
You may purchase these features like VPN, SSL, WordPress Hosting, etc (If you need). But my advice is, don’t purchase them along with the domain name. You can buy them separately later on.
For now, let’s just click on the ‘Checkout’ button.
Step 6:
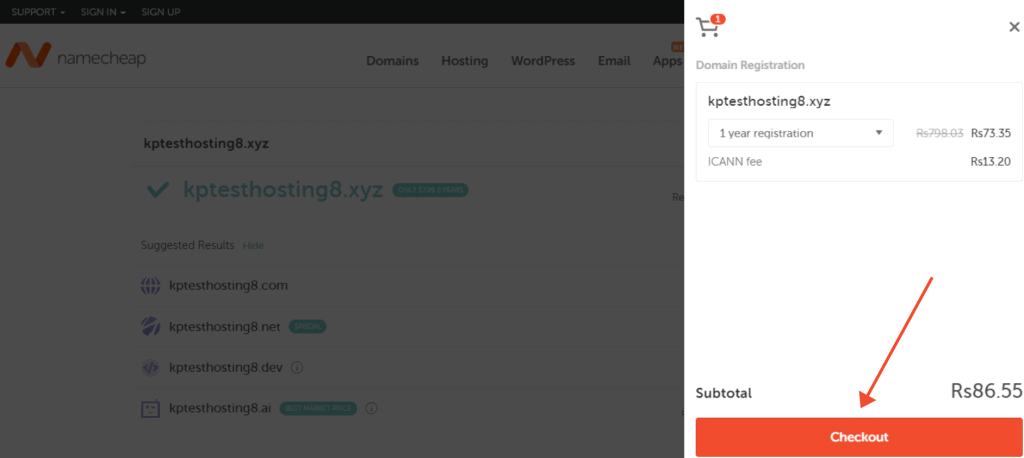
The next screen will show you the total domain registration amount plus the ICANN fee.
ICANN is the annual fee (of $0.18) charged on every domain registration, transfer, or renewal.
We will click on the ‘Checkout’ button to proceed further.
Step 7:
Next, we come to the Details page. Here, you can select the duration (in years) that you want to register your domain name for.
It can range from anywhere between 1 year to 10 years.
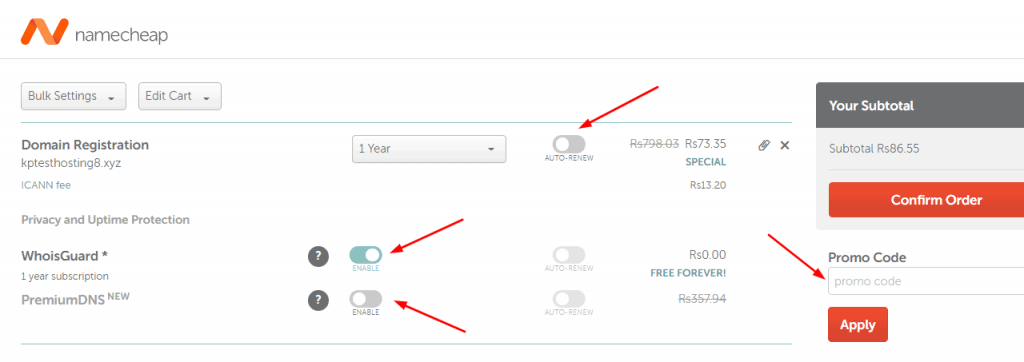
Right beside it, you have the option to turn ‘Auto-Renew’ on. This feature renews your domain name after your selected time is up.
It might be a good option if you are an established business.
But if you are just doing this for a trial or if you are a beginner, then I suggest you keep the auto-renew feature off. They will usually mail you before it expires.
Then we have the option for WhoisGuard.
WHOIS is a database that contains the registration and contact details for all domains on the Internet.
The problem is, this information is available to the public and anyone can get hold of your contact number or home address just by running a simple search. We don’t want that, right?
So, some domain registrars provide a free WhoisGuard along with the domain. It offers privacy and protection to your domain by keeping your contact and registration details safe.
Namecheap does provide free WhoisGuard with their domain names.
The last option that we find on this page is Premium DNS. If you are just starting out with your website, you won’t need a Premium DNS.
However, if you are an established brand that receives hoards of traffic every second, then you should avail Premium DNS option for sure.
A Premium DNS guarantees a greater and more improved uptime. It comes with a secondary DNS that makes sure your website never goes offline.
Along with this, it also has a more interactive user interface for managing your domain, and ensures better website security and performance.
Now, if you have a Promo Code, you can apply it here to get an extra discount. Finally, click on the ‘Confirm Order’ button.
Step 8:
Once you click on the Confirm button, the next step is to add your payment details.
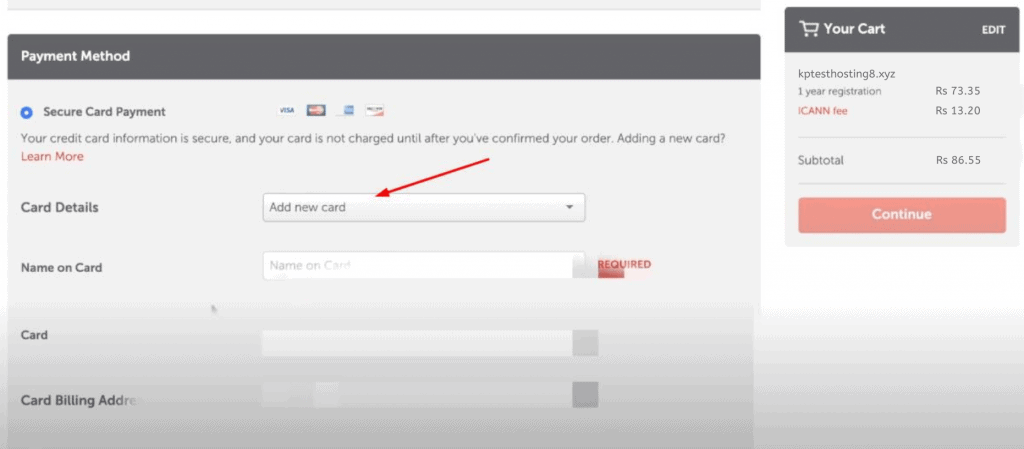
Here, you will enter your card details, billing address, etc.
One thing to remember here is, you must have a credit/debit card with international transaction rights. Namecheap does not accept Google Pay, Amazon Pay, Rupay cards, etc.
I recommend getting a Visa or Master debit card and enable your international transactions before buying domain from Namecheap.
Step 9:
Now, we come to the Renewal Settings. Here, specify what features you wish to renew automatically every year.
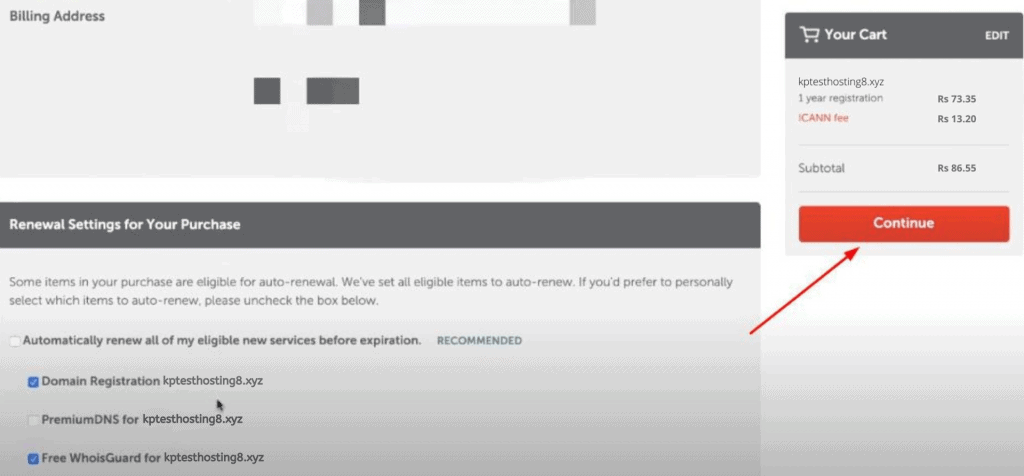
Again, I recommend turning off Auto-Renew, but it depends on your needs. Check the items you want for automatic renewal. You can always edit them later.
Now, click on the ‘Continue’ button.
Step 10:
The next screen will show you the total amount you have to pay for your domain registration.
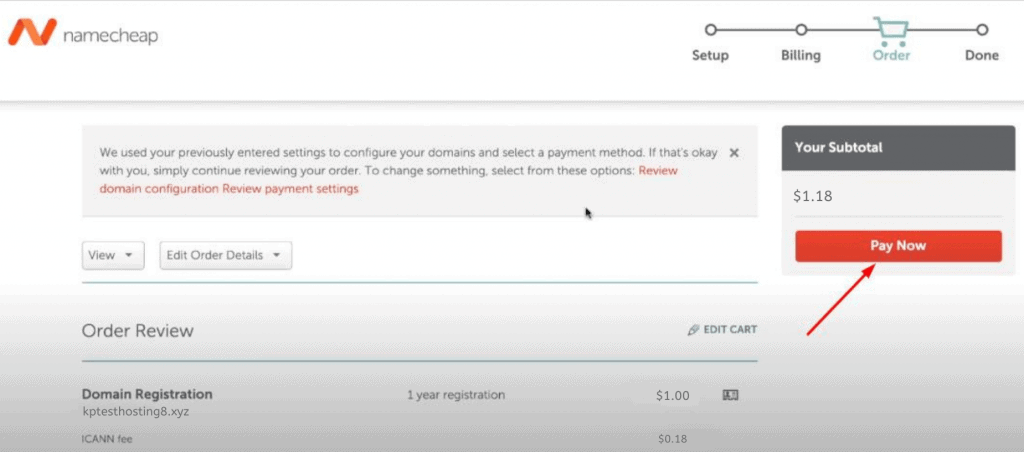
Check if the details are correct and then click on ‘Pay Now’.
Step 11:
After they process this step, you will get a Thank-you message with the details of your purchase.
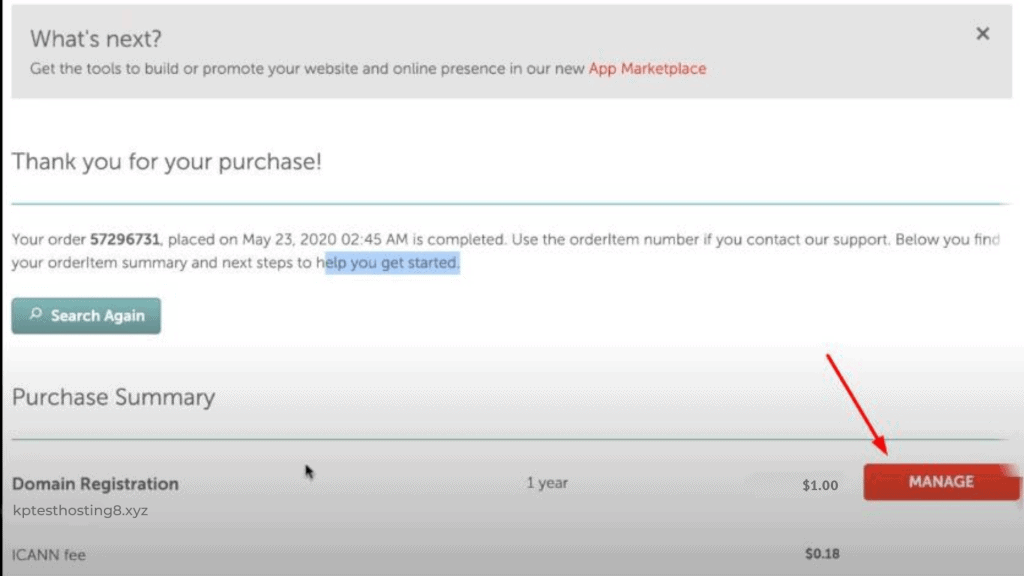
Click on the ‘Manage’ button to edit your domain settings.
Changing Nameservers
In this step, we are going to change the Nameservers and point them to our hosting.
But first, let us understand what a Nameserver is and what it does.
Nameservers are a part of the Domain Name System and their task is to translate the domain names into IP addresses by using the information in the DNS.
Nameservers are used to figure out where your website is located. Without pointing it to your hosting account or any private host, visitors won’t be able to access your website.
So, from the left sidebar, select ‘Domain List’ and under the ‘Domain’ tab, you will find the Nameservers option.
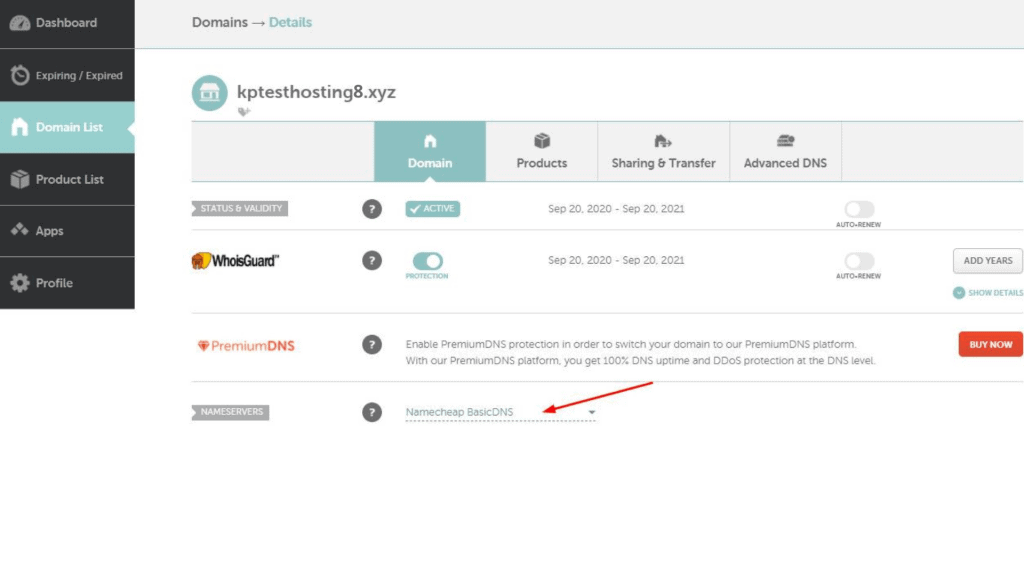
Step 13: Now, from the drop-down, select the ‘Custom DNS’ option. Here, you need to add the nameservers provided by your web hosting.

It might take anywhere between 2 to 48 hours for your domain to point to your hosting account.
Creating Email Forwards
You can also create Email forwards from your domain account.
Suppose you need a variety of email addresses for different purposes, like support, inquiry, business, etc, you can create aliases for all of them and add an email address where you want them to be forwarded.
Here, I can create different email aliases like
- hello@kptesthosting8.xyz,
- support@kptesthosting8.xyz,
- inquiry@kptesthosting8.xyz
and forward all of them to my Gmail account, i.e., kripeshadwani@gmail.com.

This is a cool feature to have many professional emails without buying them separately.
The drawback is that you can only receive emails from these aliases. You cannot reply using these emails. Your reply would go through your main email only (in my case, kripeshadwani@gmail.com).
So, this was the entire process of registering a domain name. I hope this article helps you purchase a domain name for yourself.
What more topics do you guys want me to cover on this blog? Let me know in the comments section below.
If you enjoyed reading this article and want to get updated with more such technical content, then make sure you subscribe to the email newsletter.
This is Kripesh signing off. Take care and stay safe, and I’ll see you in the next article.


4 thoughts on “How to Buy a Domain Name (A Step-by-Step Guide For Beginners)”
Comments are closed.