Canva is a tool with infinite possibilities! I recently discovered while doing Canva Pro review how much you can actually do with this simple graphic design tool!
Today’s article is about Canva Tips and Tricks, where I’ll be sharing 50+ interesting Canva tips and hacks to help you get the most out of Canva and design better graphics quickly and effortlessly!
Mind you, some of these hacks will blow your mind! I was most impressed to know that you can live stream through Canva!
Want to know how to do that? Well, let’s dive right into our article then!
- From Where I learned About Canva Tips
- Tip 1: Use Pexels & Pixabay Inside Canva
- Tip 2: Select Separate Layers for Editing Designs
- Tip 3: Use Canva Frames to Display Mockups or Create Collages
- Tip 4: Useful Canva Shortcuts to Save Time
- Tip 5: Upload Images Quickly Using Drag and Drop Upload
- Tip 6: Group Different Elements Together
- Tip 7: Use Smart Mockups and Bring Your Products to Life!
- Tip 8: Move Elements Around the Editor with Ease
- Tip 9: Lock Elements in their Place
- Tip 10: Quickly Filter Search Results
- Tip 11: Add a QR Code to your Designs
- Tip 12: Customize Colors of Vector Art
- Tip 13: Use Tidy Up for Even Spacing
- Tip 14: Add Clickable Links in PDFs
- Tip 15: Animate your Design With Canva Animation
- Tip 16: Search for Templates from the Home Page
- Tip 17: Live Stream through Canva
- Tip 18: Create Websites through Canva
- Tip 19: Copy the Style of an Element
- Tip 20: View Similar Design Elements
- Tip 21: Use Canva Screen Recorder to Record Your Presentations
- Tip 22: Add a Gradient to any Background or Shape
- Tip 23: Canva Curved Text and Effects
- Tip 24: Use Canva’s Brand Kit to Streamline Your Designs
- Tip 25: Leave Comments while Collaborating
- Tip 26: Adjust Text Position Using Rulers
- Tip 27: Create Awesome Logos With Canva Logo Maker
- Tip 28: Erase Backgrounds using Canva Background Remover Tool
- Tip 29: Use Canva’s Magic Resize Tool to Optimize Your Posts
- Tip 30: Create the Highlight Effect for YouTube Thumbnail
- Tip 31: Design Beautiful Graphs and Charts With Canva Graph Maker
- Tip 32: Save Your Designs as Templates
- Tip 33: Create Attractive Color Combinations With Canva’s Color Palette Generator
- Tip 34: Get Color Palette Ideas and Font Combinations
- Tip 35: Use Pre-Designed Color and Font Combinations
- Tip 36: Select Colors with Color Eyedropper Tool
- Tip 37: Import and Edit PDF Files
- Tip 38: Blurring the Background of an Image
- Tip 39: Text Masking with Alphabet Frames
- Tip 40: Converting Photos into Paintings
- Tip 41: Create Magic Design Templates
- Tip 42: Erase any Element with Magic Eraser
- Tip 43: Insert Custom Elements with Magic Edit
- Tip 44: Make your Pictures Color Pop
- Tip 45: Generate Engaging Content with Magic Write
- Tip 46: Personalize your Designs with Hand Drawings
- Tip 47: Translate Content into Different Languages
- Tip 48: Sync Music Beats with Video
- Tip 49: Convert Text into AI Images
- Tip 50: Replace Elements in Bulk
- Tip 51: Add New Fonts
- Conclusion
From Where I learned About Canva Tips
I recently reviewed Canva Pro on my YouTube channel and Blog. So for that review I extensively used Canva and learned about the shortcuts and secret tips to use Canva efficiently.
Canva is not the only design tool that I’ve used. I’ve active paid plans of Pixelied and Crello as well. I’ve also reviewed Pixelied and Crello in detail and by Canva is the biggest design tool on internet right now.
To effectively use Canva, you should know the tips I’m about to tell you. These are MUST learn Canva tips.
In this article I’m sharing all Canva tips & tricks that I’ve learned. Majority of them will work with Canva free version.
Tip 1: Use Pexels & Pixabay Inside Canva
This tip is for the Canva Free plan users. If you’ve used online designing tools, you must know that the free stock photo collection of Canva is not as impressive as Pixelied or Crello.
But why should that stop you from creating striking designs?
Canva integrates the Pexels and Pixabay libraries inside its editor, so you can get access to a better photo collection and a large variety of stock images!
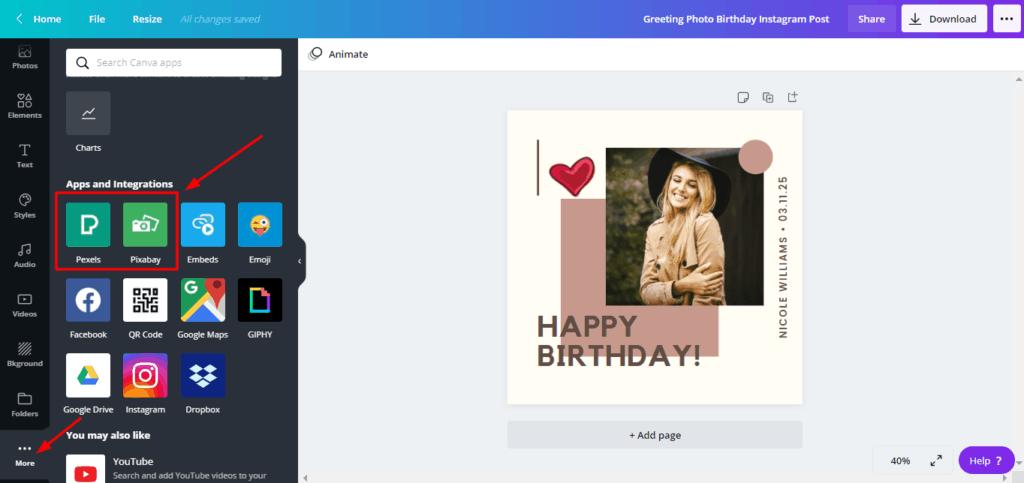
Step 1: Go over to the Canva Editor and click on the ‘More’ option from the left sidebar.
Step 2: Under Integrations, choose Pexels or Pixabay library and search for your favourite images.
Tip 2: Select Separate Layers for Editing Designs
Don’t you hate it when you have multiple layers in your design, but tweaking a single element ends up disturbing all the others? I feel your pain!
Finally, the most awaited feature is here! Now, you can work in layers on Canva, just like Photoshop!
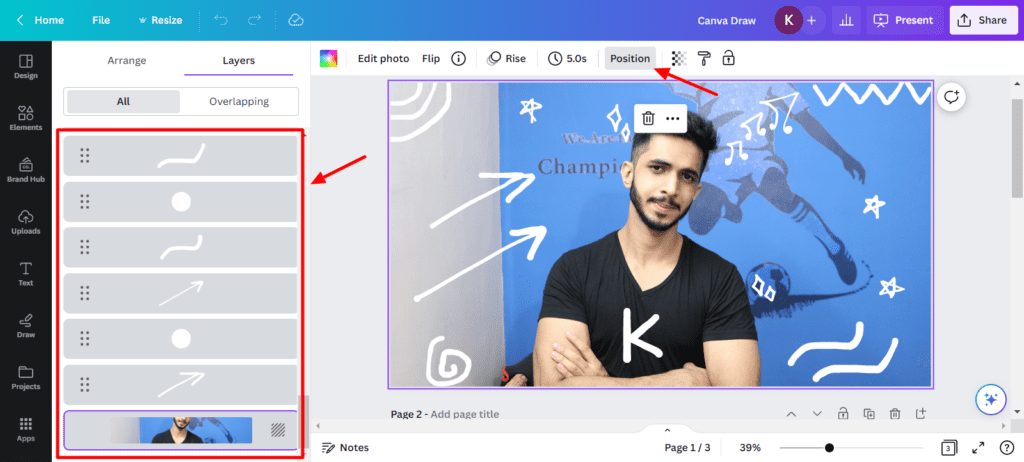
Once you add elements to your design, simply click on the Positions option and you will be able to select the different layers you need to work on.
I really think layers should’ve been implemented way earlier! It’s a super cool feature and I’m truly relieved to finally find it on Canva.
Tip 3: Use Canva Frames to Display Mockups or Create Collages
Canva Frames is an amazing feature to add beautiful frames around your designs, create photo collages, grids, cutouts of different shapes, and even photo mockups!
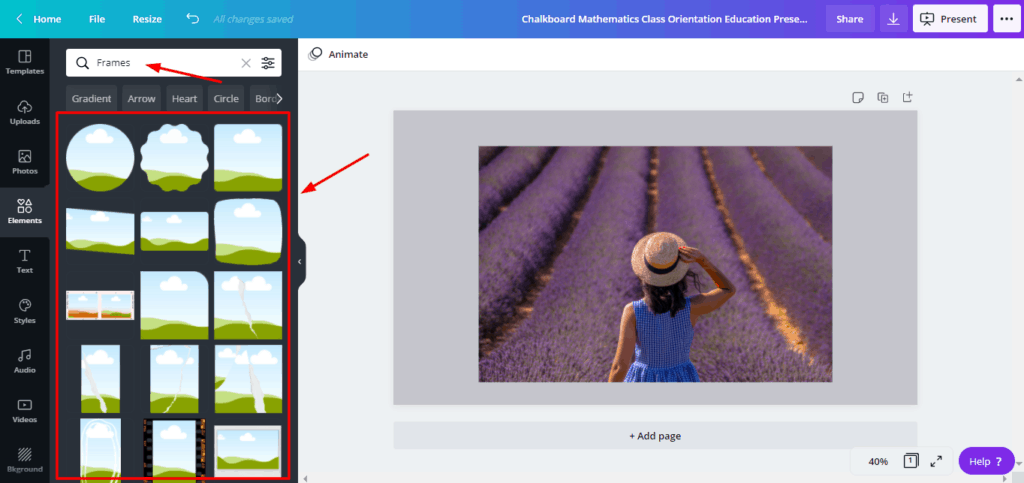
Step 1: Under the Elements tab, type in Frames in the search bar.
Step 2: Select a frame/grid/mockup of your choice.
Step 3: Drag and drop any image within it and double-click to re-adjust it.
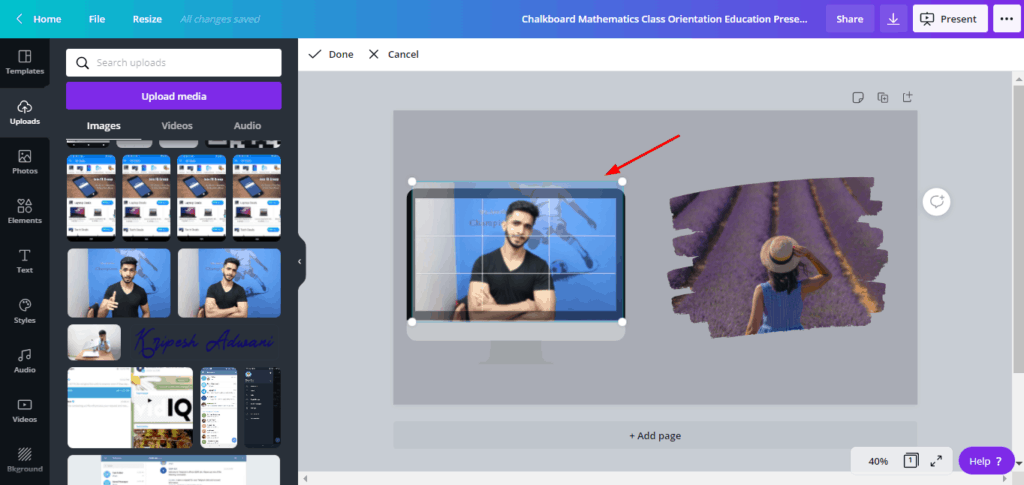
Mockups are very useful for creating advertisements or promotional marketing stuff! If you specifically need a tool to design mockups, check out my detailed video on Placeit!
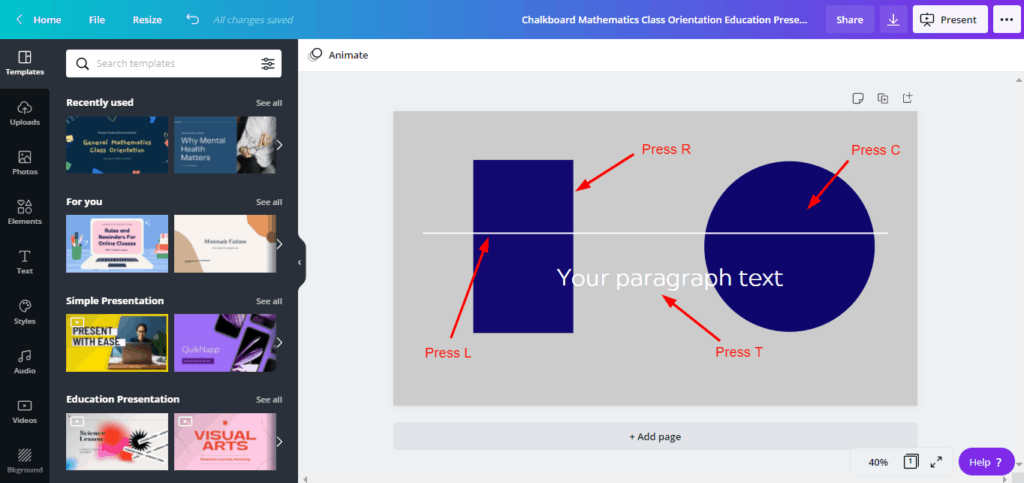
Tip 4: Useful Canva Shortcuts to Save Time
Canva makes your designing experience even more smooth and effective by supporting lots of handy keyboard shortcuts.
| Function | Key |
| Add a Text Box | T |
| Add a Circle | C |
| Add a Line | L |
| Add a Rectangle | R |
| Zoom in/out | Ctrl/Cmd + ‘+’ or Ctrl/Cmd + Scroll |
| Duplicate an element | Ctrl/Cmd + D |
| Crop an image | Ctrl/Cmd + drag to resize |
Apart from that Canva does have many more shortcuts that can be found on Canva website. They have created a beautiful shortcuts infographic.
Tip 5: Upload Images Quickly Using Drag and Drop Upload
Nobody has got time to select and upload images one by one onto the Canva Editor. Choose the smart way!
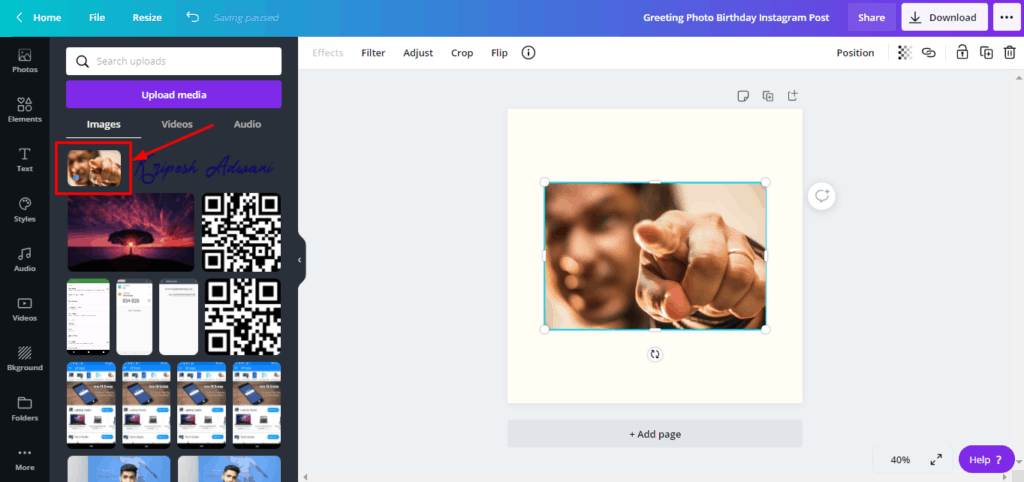
Select an image from your device and just drag it onto the Canva editor. It will be automatically uploaded!
Additionally, if you want to use an image from the Internet, you don’t need to download it and then upload it on Canva. Simply hit the Copy button and paste it on the Editor!
I found Canva’s drag-and-drop upload to be very smooth and quick as compared to other editors like Crello.
Tip 6: Group Different Elements Together
How do you move a particular set of elements without disturbing the spacing and arrangement of the whole design?
This is possible by using the Grouping feature.
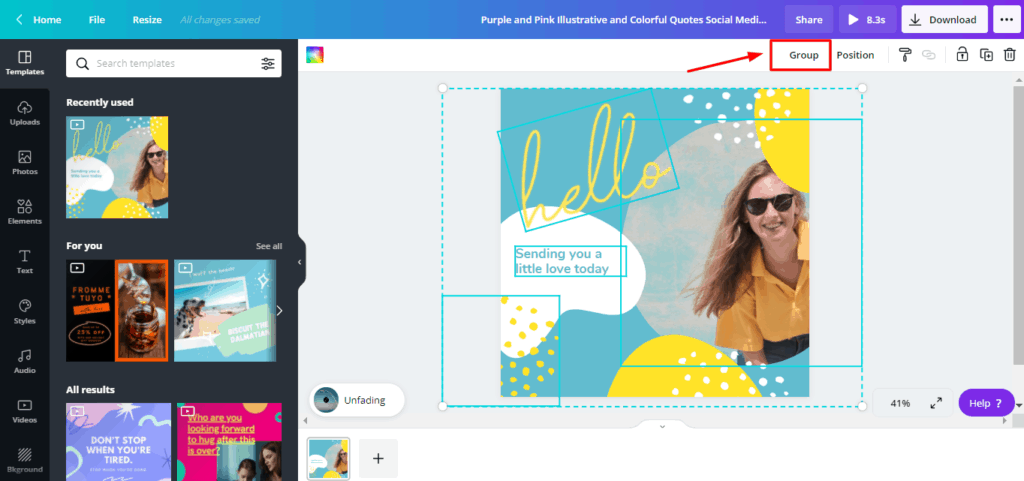
Step 1: Hold the Shift key and select all the elements you want to move.
Step 2: Click on the Group button.
Alternatively, you can also use the keyboard shortcut:
Grouping : (Select elements) + Ctrl/Cmd + G.
Ungrouping: Ctrl/Cmd + Shift + G.
I found this feature quite useful while working on complex designs consisting of multiple layers and dozens of elements!
Tip 7: Use Smart Mockups and Bring Your Products to Life!
If you are into designing printed products, apparel, technology, clothing line, books or anything similar, Canva integrates with SmartMockups to bring your work to life!
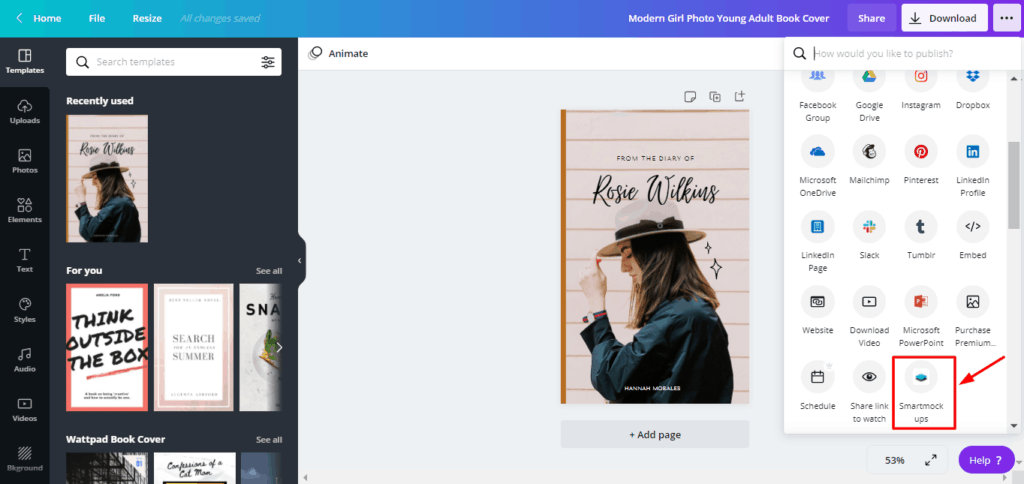
Step 1: Design your image and click on the three dots in the right corner.
Step 2: Under the Share tab, you’ll find the Smart Mockups option.
Step 3: Sign Up on SmartMockups with your email id.
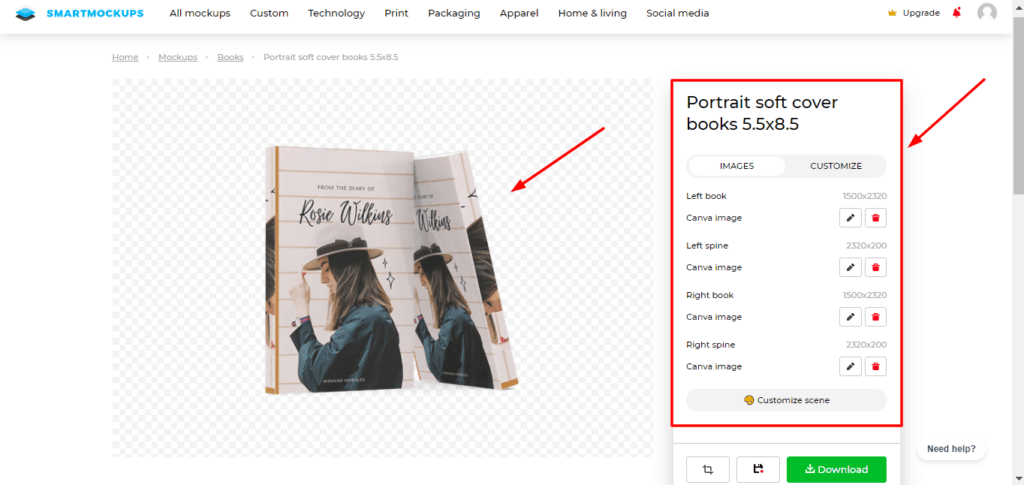
Now, you can view your books, T-shirts, your websites, and other products printed on real-life objects! It’s an outstanding feature to test-run your products before actually getting the designs printed!
Tip 8: Move Elements Around the Editor with Ease
Need absolute precision while shifting various elements in your design? Here’s a trick. Use arrow keys to shift them by one unit.
Alternately, to roughly adjust elements on your design, use Shift + arrow keys to move them by ten units.
Tip 9: Lock Elements in their Place
While working with lots of elements, it’s tough to select them individually, especially when there are layers too!
An easy option would be locking the completed designs in their place.
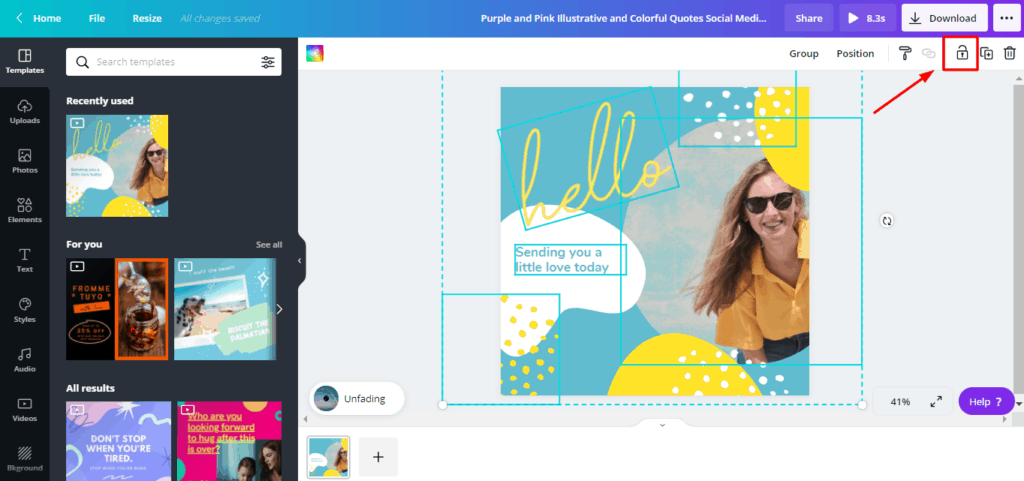
Step 1: Select the finalized elements and group them together.
Step 2: Click on the Lock icon.
Now, whatever you do with the other elements on the page won’t affect the locked elements. They will continue to stay in their position until unlocked.
Tip 10: Quickly Filter Search Results
If you have a Canva Pro subscription, why would you want to use the freely available assets at all, right?
While searching for images, elements, videos, etc you can a Filter icon beside the search bar.
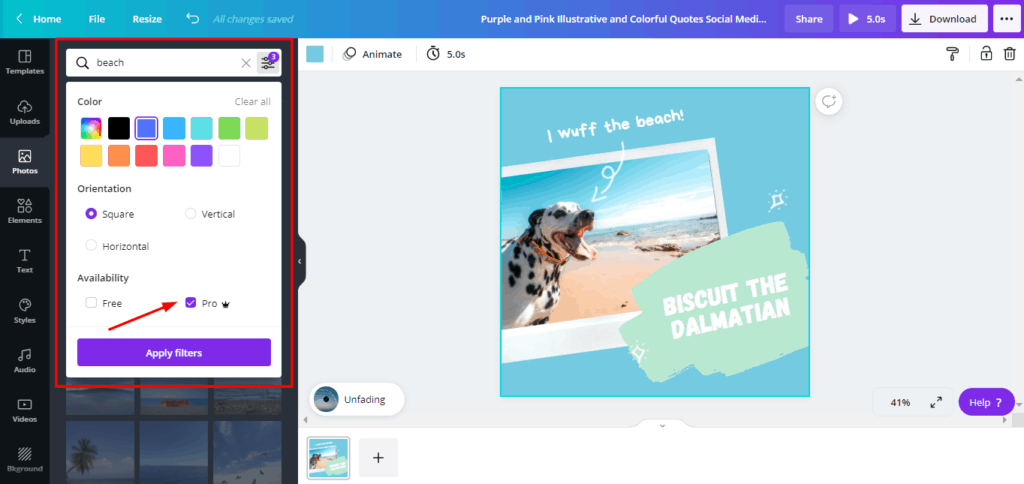
Using it, you can filter your results by ‘Pro’ to only view the premium images.
Additionally, you can also filter by
- Color
- Type of animation
- Orientation (Square, Vertical, Horizontal, etc)
Tip 11: Add a QR Code to your Designs
Canva’s URL Generator is extremely helpful while designing business cards, or marketing materials to promote your app, website, or brand.
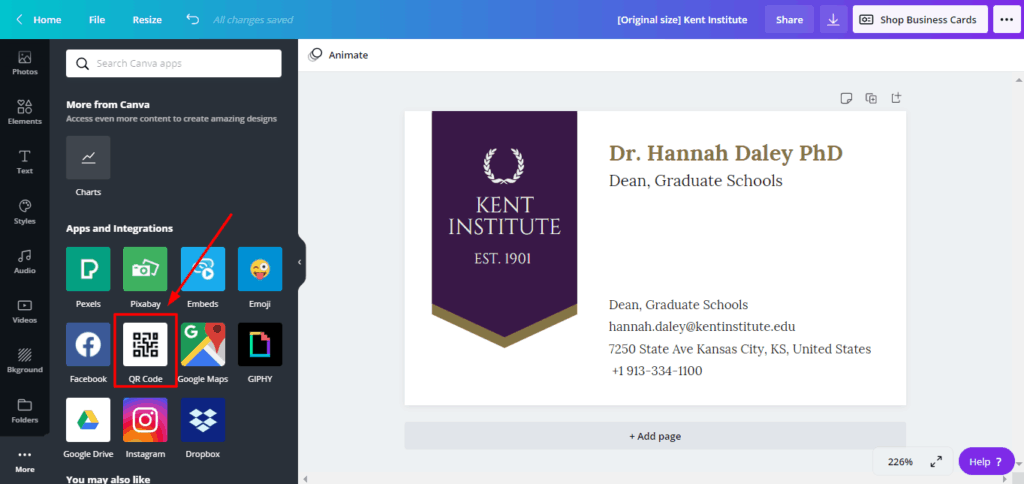
Step 1: Go to the ‘More’ option from the left sidebar.
Step 2: Select the QR code Generator under Apps and Integrations.
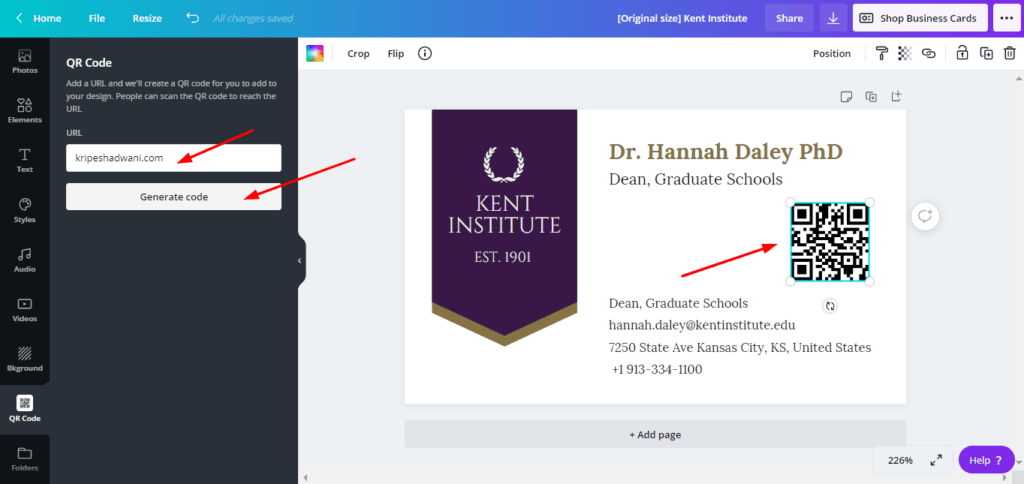
Step 3: Add the URL to your blog, website, company, or your app.
Your link will be converted into a QR code that people can scan it through their mobile phones.
Tip 12: Customize Colors of Vector Art
Do you know that it’s possible to change colors of your vector elements on Canva?
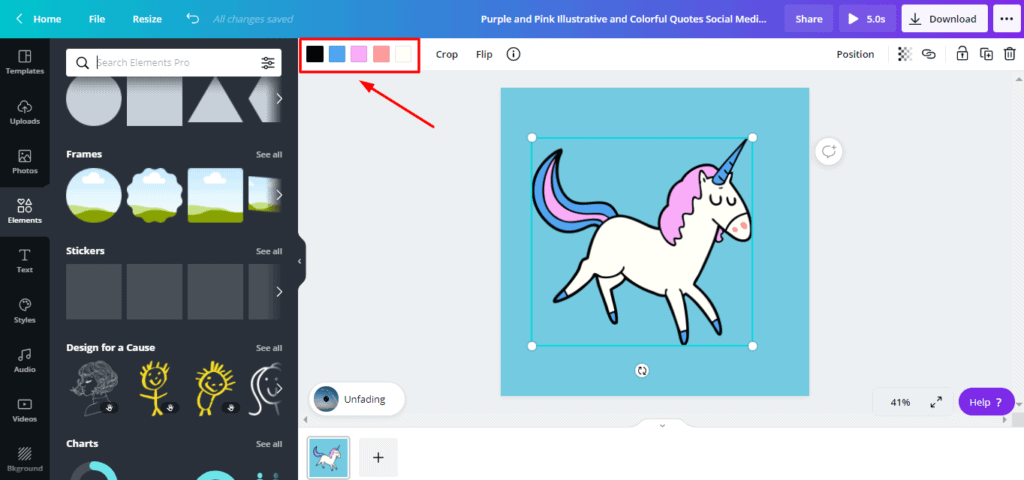
Whenever you select any vector element, the header bar displays all the colors that it is made up of.
Click on the color you wish to edit and choose a different one of your choice!
Tip 13: Use Tidy Up for Even Spacing
Have lots of elements scattered across your page? Manually aligning them is too old-fashioned! Instead, try the Tidy-Up feature!
Step 1: Select the elements you wish to align and click on Position.
Step 2: Choose a direction to align –
- Left, right, or center
- Middle, bottom, or top
Step 3: Now, use the ‘Tidy Up’ feature to apply equal spacing between your elements and create a pleasing graphic!
Tip 14: Add Clickable Links in PDFs
Adding hyperlinks within your ebooks and documents is easier than ever with Canva. Just follow this simple process.
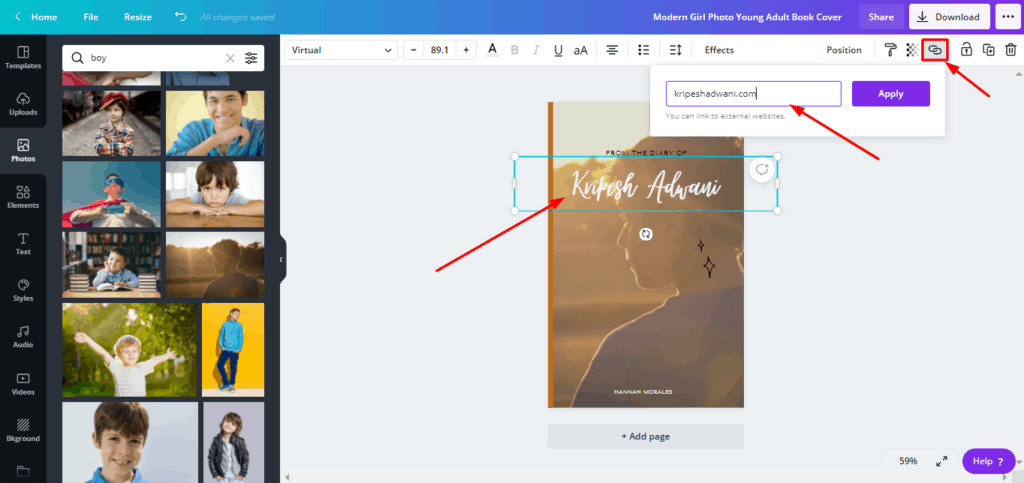
Step 1: Choose the text you wish to add a link on.
Step 2: Click on the hyperlink icon on the top right.
Step 3: Type in the URL to an external website.
And you’re done! Now, when you export your design in PDF format, the link would work.
However, the only downside is that hyperlinks only work with PDFs. They won’t work on JPG, PNG, or other file formats.
Tip 15: Animate your Design With Canva Animation
Canva also has 6 different animation effects in the free version, and 13 effects in the Pro plan that you can use to make your designs even more attractive!
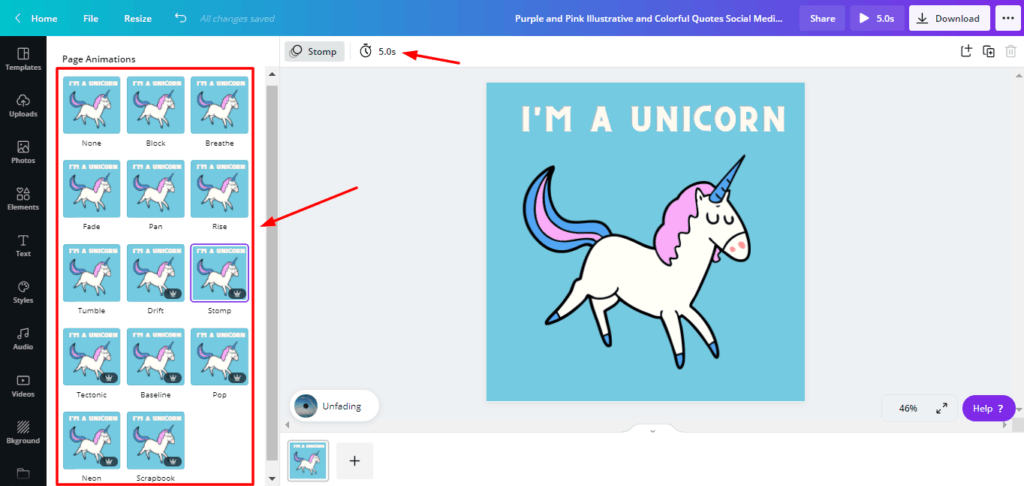
As soon as you add any design element on a blank page, you will find the animate button on the top left. Use it to create moving elements!
Recently, Canva has also launched the custom animations feature. With this tool, you can create animations with any element and insert them into your design. Here’s how to do it.
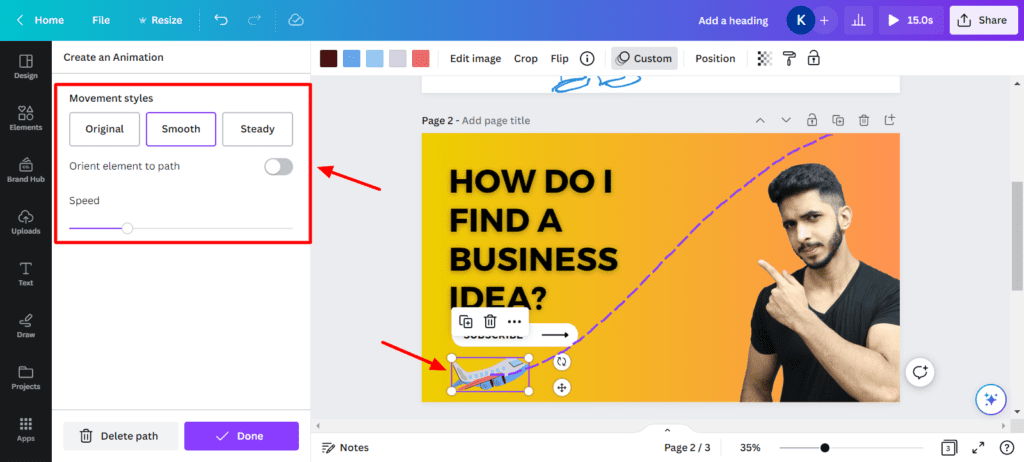
Step 1: Select any element or text on your editor and click on the Animate button.
Step 2: Now, select the element and drag it across the screen as you want.
Step 3: Specify a movement style and speed.
Finally, you have created a custom animation on your design!
Tip 16: Search for Templates from the Home Page
We all choose our design format first and then move on to selecting templates, right? But do you know that the format of your design might limit the search results?
The perfect marketing template you’re looking for might not be available in the Instagram story format!
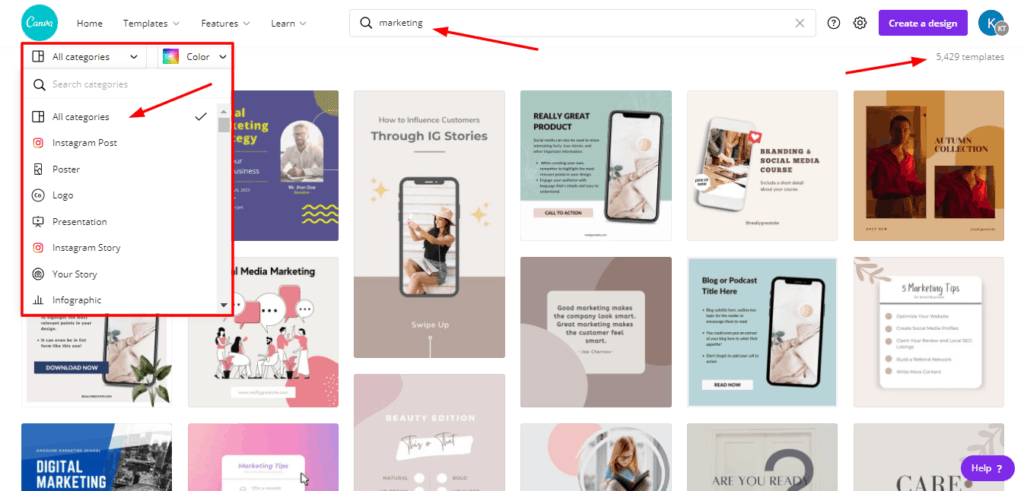
Therefore, you should search for templates from the home page to have a wide variety of options to select from. Later, you can resize it according to the format you want to use it on.
Tip 17: Live Stream through Canva
Sounds unbelievable? I was stunned too! But you can actually start a live stream through Canva.
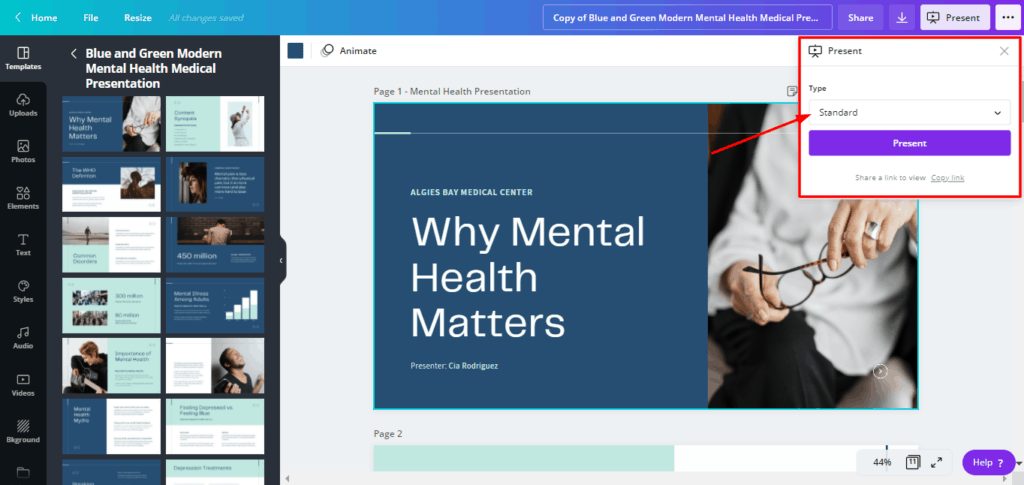
Step 1: Click on the Present option available under the ‘Recommended’ tab.
Step 2: Select the Standard Presentation mode. You’ll find a tiny live stream button on the bottom.
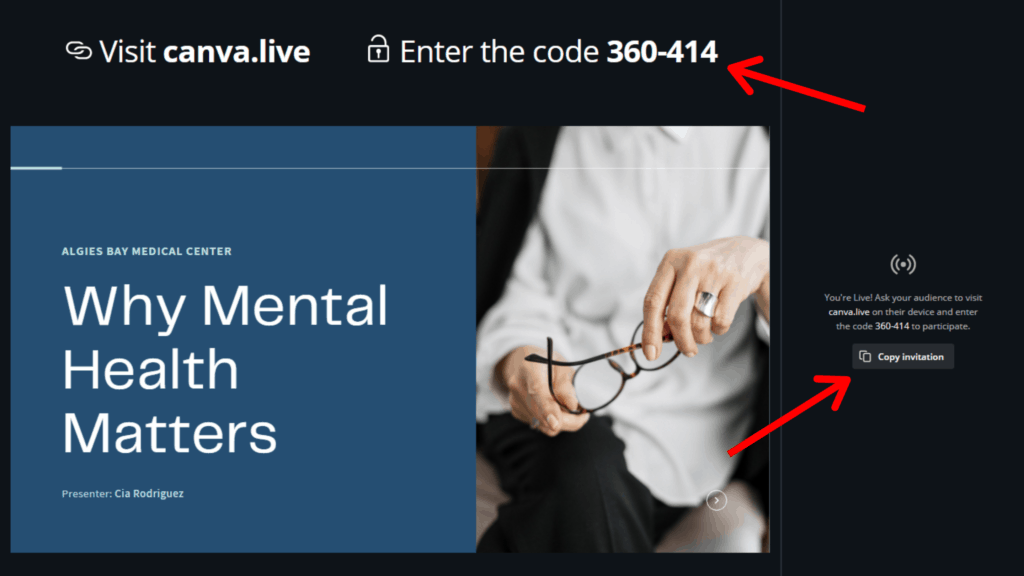
Step 3: Start a new session and copy the invitation link.
Step 4: Send this link to people and start live streaming!
The best part is that your audience doesn’t need an app or account to access your live stream. They can directly ask questions from their browsers.
So, if you are an instructor, you can use this function of Canva to conduct webinars, Question and Answer sessions, etc.
Tip 18: Create Websites through Canva
Oh, yes. You heard it right. It is possible to create a basic website with Canva.
Select any design templates from the website templates available under Business Templates.
Now, edit the text, colors, images, elements, etc as per your requirements and add your URL on the page.
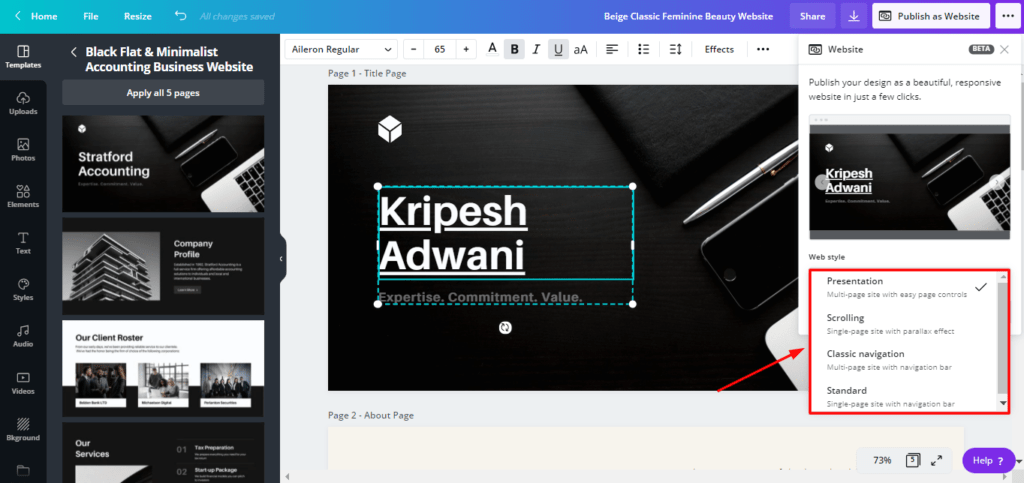
While downloading, you get lots of options to publish as a website. When you click on Publish, your website is created through Canva.
This is great for creating landing pages or portfolio sites that don’t need to be updated regularly.
The only problem is that you cannot change the Canva URL. However, you can use link shortener tools to hide the Canva links.
Tip 19: Copy the Style of an Element
While designing, if you have multiple texts or elements on the page and you wish to streamline them, then you can use Copy style.
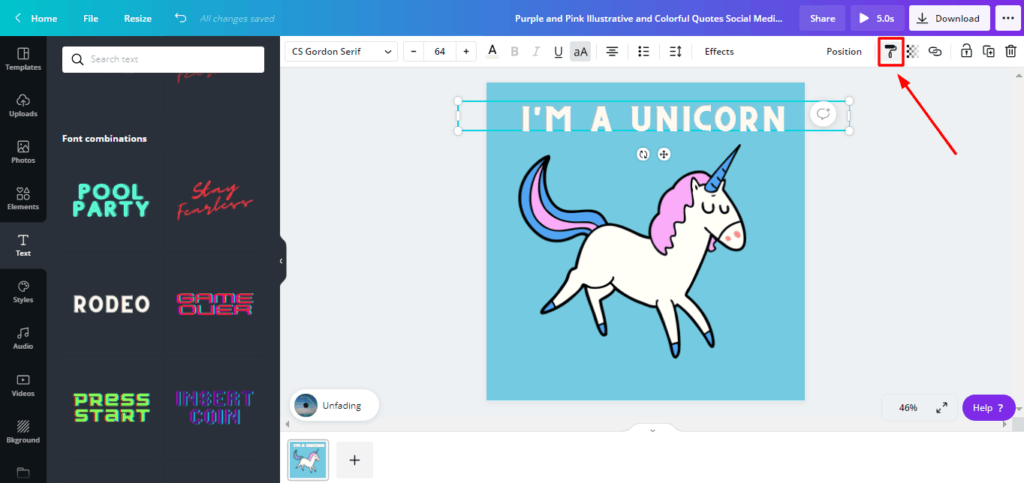
Copy style button helps you copy the font size, typeface, transparency, color, filter, and effects of one element and paste it on the other.
If you wish to copy elements or an entire group from one design to another, you can copy and paste them on the desired location! It even copies hyperlinks and all applied effects!
Tip 20: View Similar Design Elements
If you find an element attractive, and want to search for more similar elements, you can do so by clicking on the Information button above.
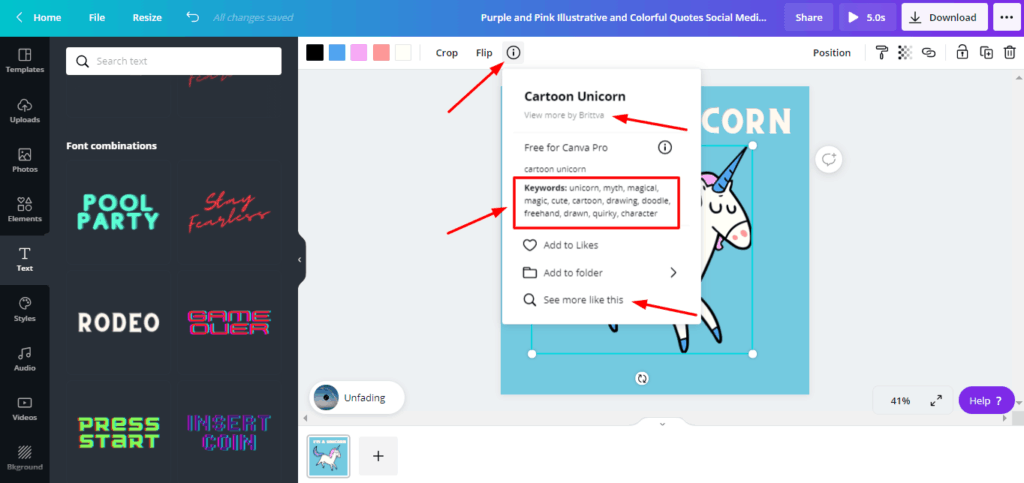
Then, you can either search similar Elements through the keywords used, or click on the ‘See more like this’ button.
You can also view the designs by a specific designer by clicking on ‘View more by designer’.
Tip 21: Use Canva Screen Recorder to Record Your Presentations
Yes! Canva has an in-built screen recorder! If you are a student, a teacher, or a business professional, you will find it convenient to record your presentations on Canva.
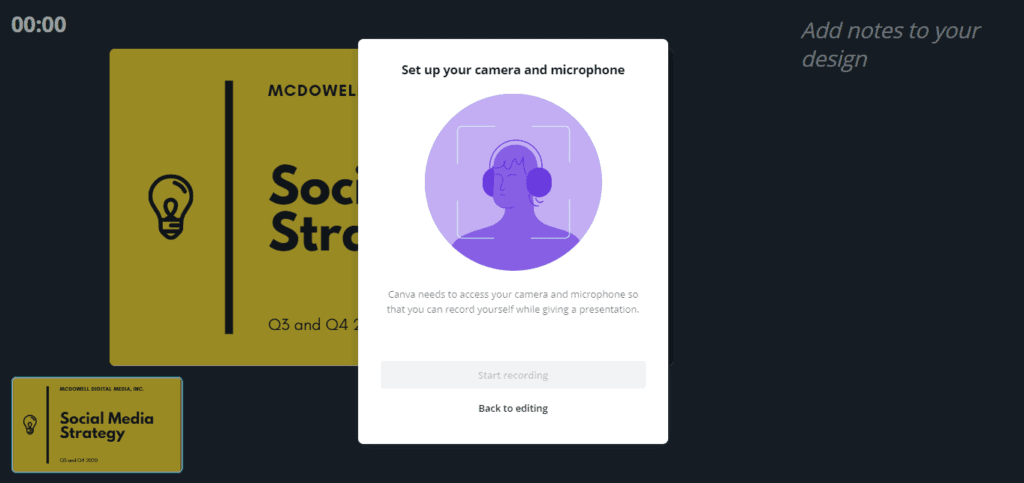
Step 1: Select ‘Present and Record’ from the Recommended Tab.
Step 2: Click on ‘Go to the Recording Studio’.
Step 3: Adjust your mic and camera settings and start recording!
You can also add relevant notes to be displayed on your screen while presenting. When you download or share a link to your recorded presentation, the notes would be hidden.
Recently, they have also introduced ‘Audio-only talking presentations’, so you can simply record your voice along with the presentation!
P.S. You can even record your own videos in Canva from the Uploads tab now. Go check it out!
Tip 22: Add a Gradient to any Background or Shape
Now, Canva has also introduced an easy way to add gradients to different shapes and backgrounds. Let’s see how.
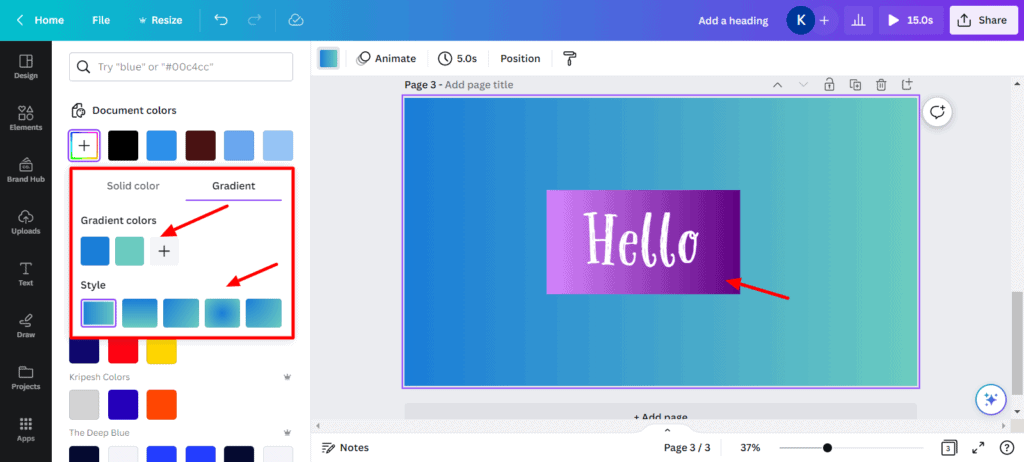
Step 1: Insert a colored shape or background on your design.
Step 2: Go to the Colors tab and choose a new color. You will find the gradient option here.
Step 3: Select at least 2 or more colors to form your gradient and pick a style.
You’ll see a beautiful gradient effect applied to your design.
Tip 23: Canva Curved Text and Effects
Click on a text on your design. Select ‘Effects’ You will find different effects you can apply on your text like shadows, hollow, echo, curve, neon, glitch effect, etc.
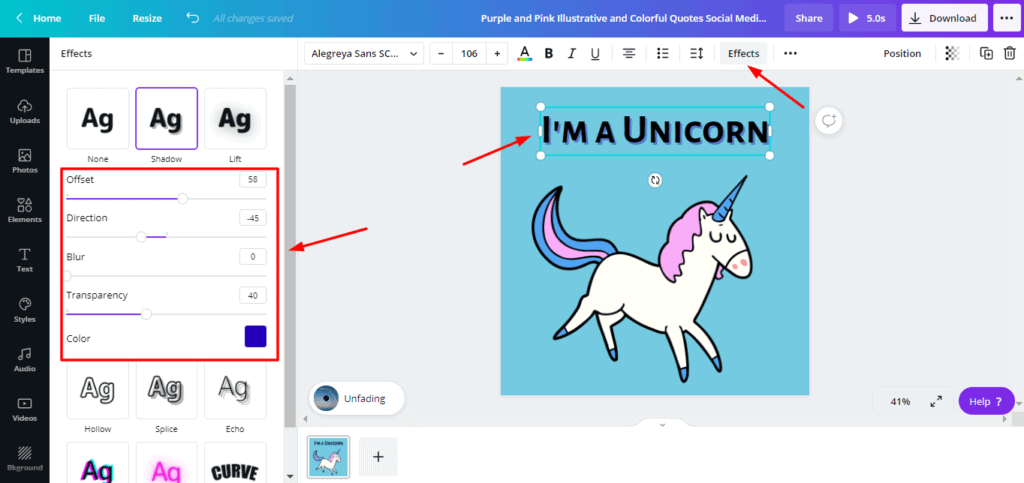
Under Shadows, you can edit the color, direction, offset, blur, and transparency of the shadow. I find it great for creating 3D effects.
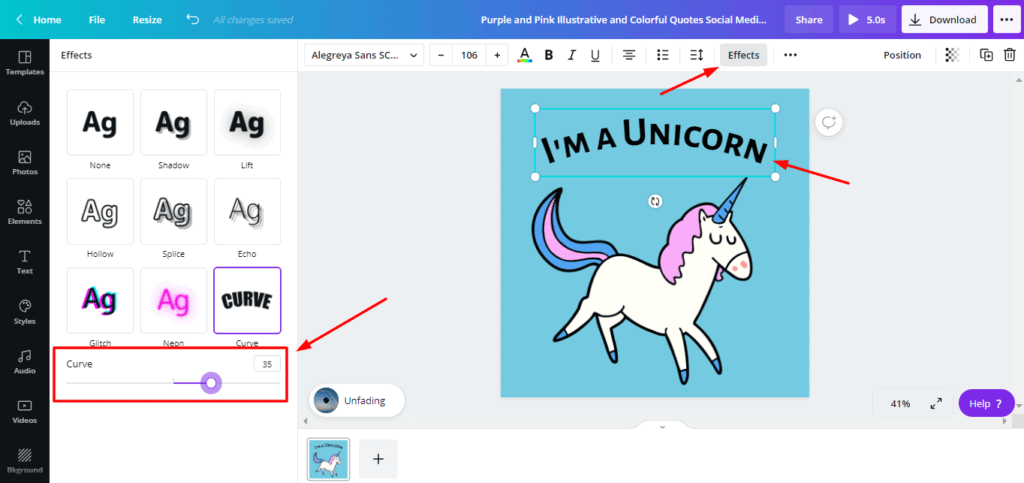
Under the Curve effect, you can vary the degree of curve on a slider bar. It’s helpful for designing logos.
Tip 24: Use Canva’s Brand Kit to Streamline Your Designs
If you have your own brand, then Brand Kits feature would be beneficial for you. It’s a pro plan feature but you can access it in free version too with some limitations.
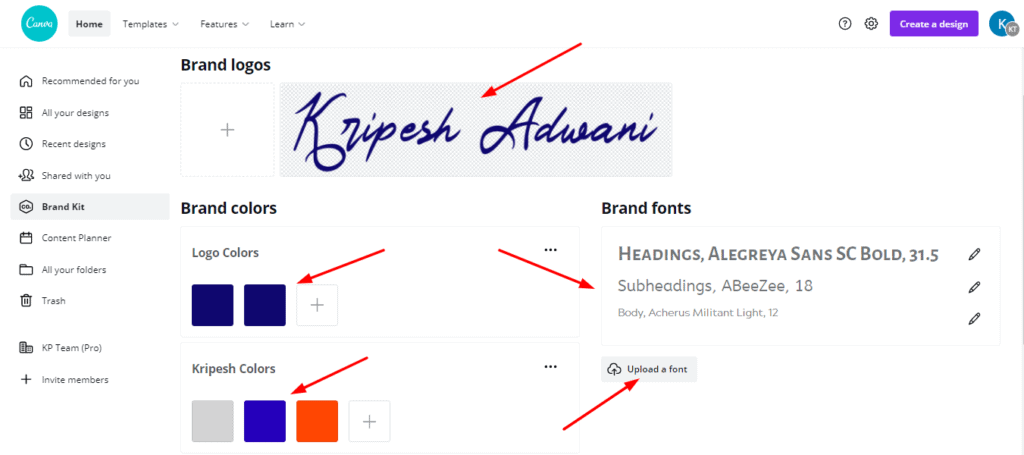
Step 1: Head over to the Brand Kit tab from the left sidebar on the home page.
Step 2: Add your brand colors and logo.
Step 3: Choose fonts from Canva’s Font Library or add custom Brand fonts.
Now, while designing social media posts, you can simply click on the Brand kit to align the design as per your brand identity.
If you want to learn basic graphic design skills, check out Canva tutorials on Canva Design School.
Canva’s Brand Kit has recently been renamed to Brand Hub. It also lets you insert additional brand assets like photos, graphics, and icons now, which is very useful.
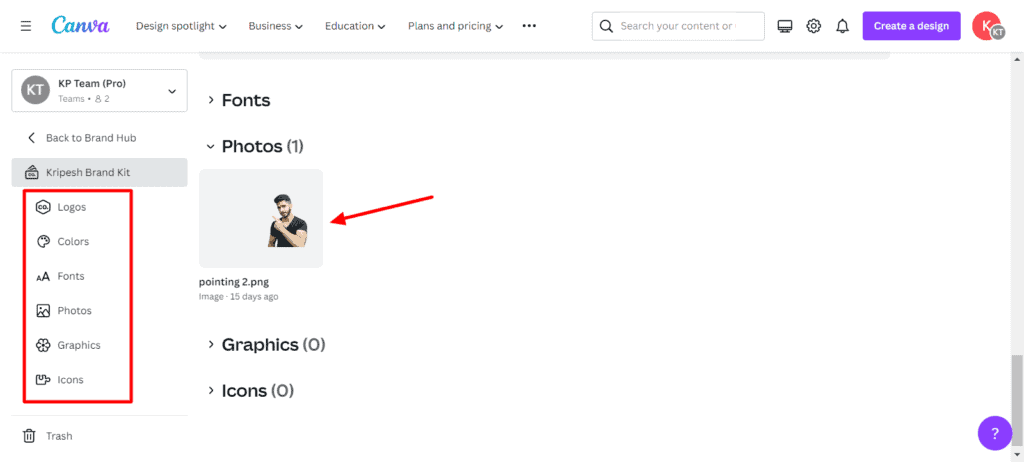
Designers can add their frequently used icons and graphics here. You can also share your entire brand hub with others at the click of a button!
Tip 25: Leave Comments while Collaborating
If you have a team of designers collaborating on a design, you can leave comments for them through the bubble icon available beside the canvas.
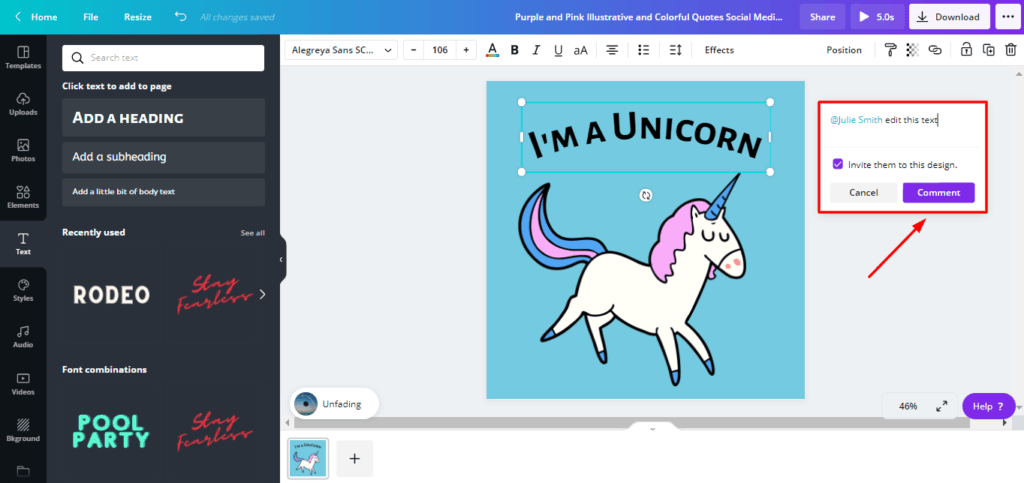
You can also tag your teammates in the comments.
Tip 26: Adjust Text Position Using Rulers
To precisely position all your elements, you can make use of the ‘Show Rulers’ option available under the File tab.
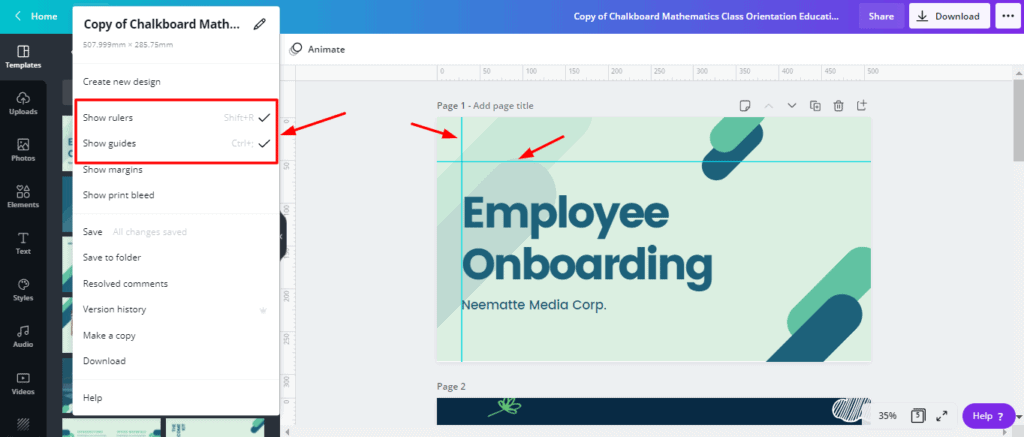
The measurement unit is pixels by default. But you can change it to cm, mm, or inches from the Resize button.
Well, if you’re someone who regularly uses Photoshop, you know the importance of guides. Now, you can implement guides on your Canva Designs too!
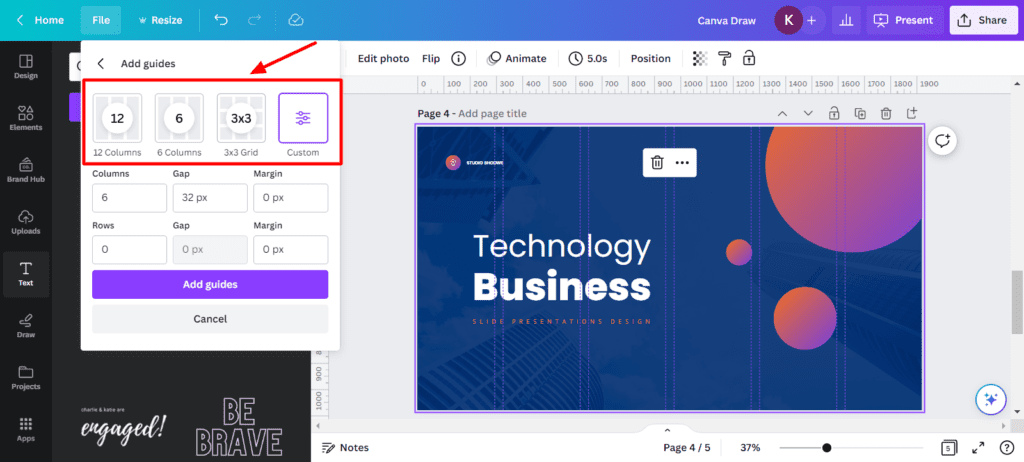
Here’s how to find the Guides option on Canva:
File > View Settings > Add Guides
You can select the type of grid you wish to insert and even create a custom guide for your design.
Tip 27: Create Awesome Logos With Canva Logo Maker
Canva has loads of templates for designing professional-looking logos. You can find them under the Business Templates category on the Home page.
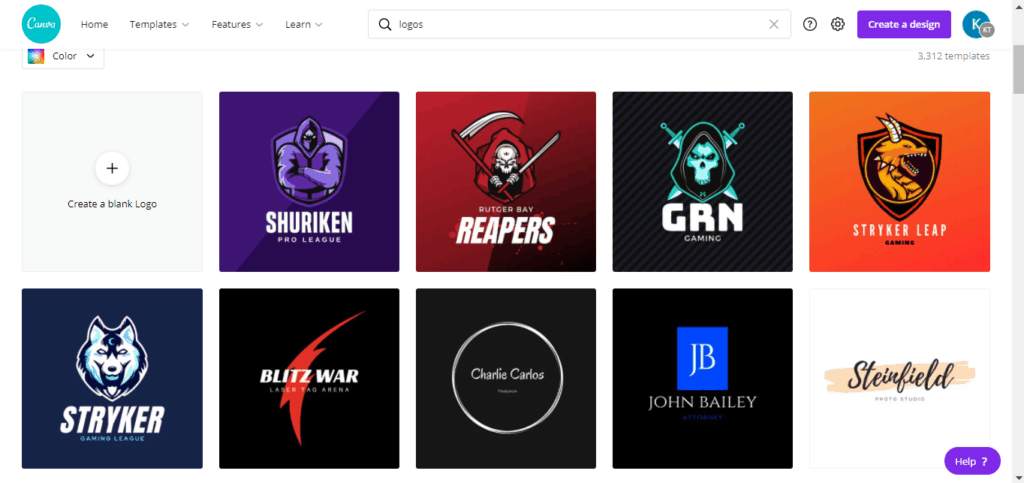
Select one of your choice, add a few tweaks, and you’re done with your logo within minutes!
Tip 28: Erase Backgrounds using Canva Background Remover Tool
I loved using this tool! It is available with the Canva Pro plan and helps you remove the background from any image with a single click!
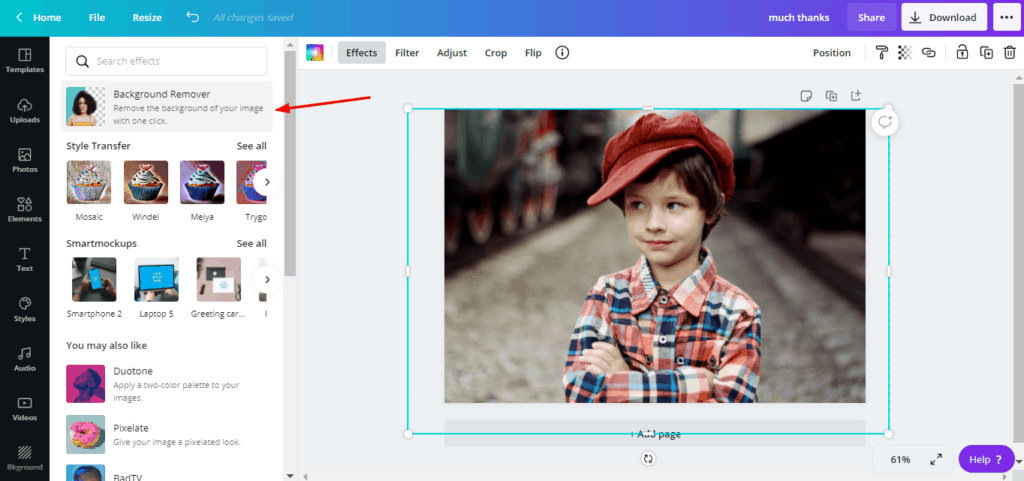
You will find this tool under the Effects tab after selecting your image.
Tip 29: Use Canva’s Magic Resize Tool to Optimize Your Posts
If you are a social media creator or manager, the Magic Resize tool of Canva Pro will let you optimize a single design for all social media platforms!
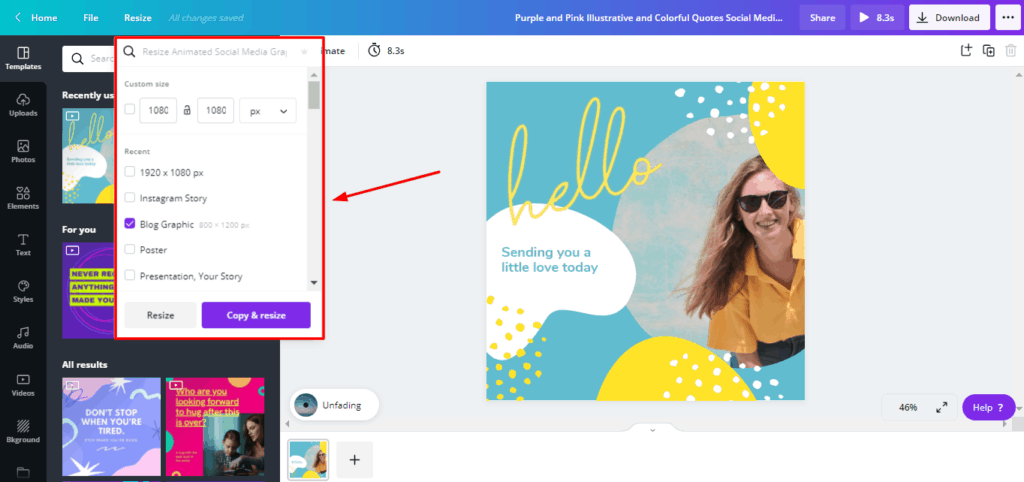
Step 1: After finishing your design, click on the Resize button on the header bar.
Step 2: Enter a design format or enter custom dimensions.
Step 3: Click Resize, and your design will be optimized according to your chosen format!
Tip 30: Create the Highlight Effect for YouTube Thumbnail
Ever wondered how YouTubers add that cool stroke effect on their thumbnails? You can do that within seconds through Canva!
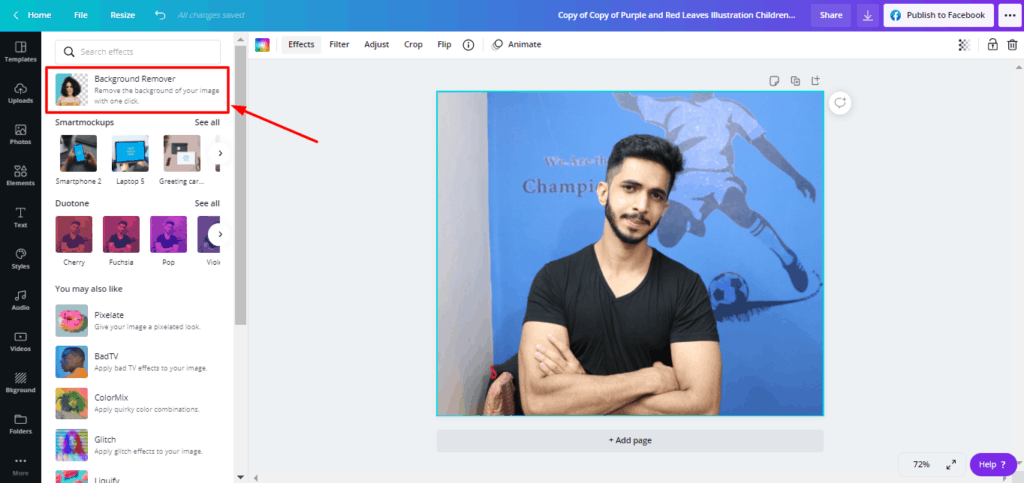
Step 1: Choose an image for your thumbnail
Step 2: Use the Background Remover tool to remove the background image.
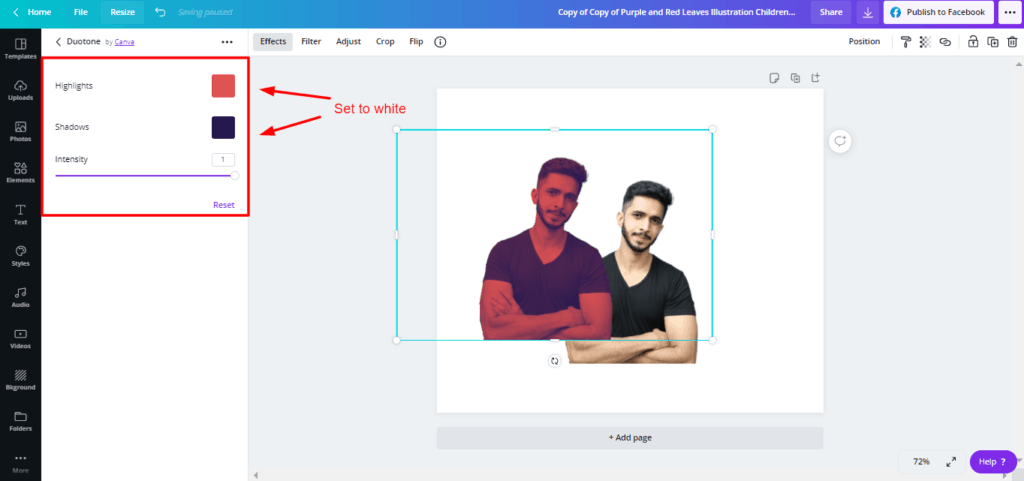
Step 2: Create another copy of this image and apply Duotone on it from the Image effects tab.
Step 3: Set the shadows and highlights both to white.
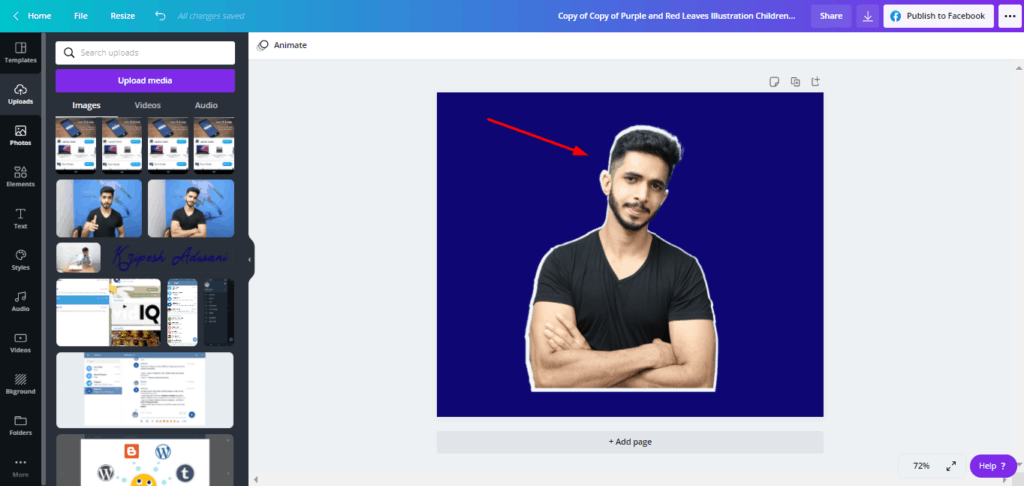
Step 4: Finally, change the background color and adjust the images.
The highlight effect is done!
Tip 31: Design Beautiful Graphs and Charts With Canva Graph Maker
Yes, Canva is a goldmine of surprising features! Need infographics, graphs, or charts for your blog post? You can create them within seconds!
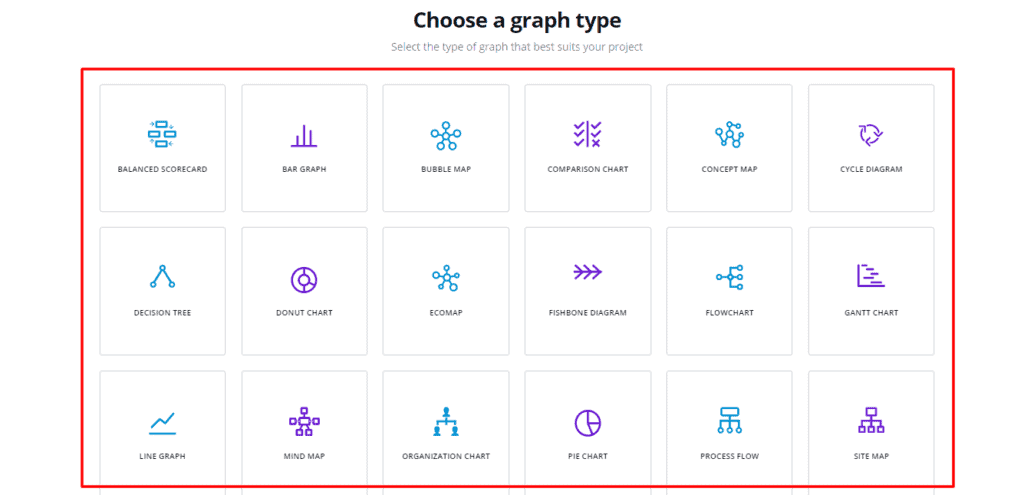
Step 1: Go to Canva Graph Maker
Step 2: Enter your document title and click on ‘Create my Graph Now.’
Step 3: Choose one from 25 different kinds of graphs. Select your favourite template and start editing!
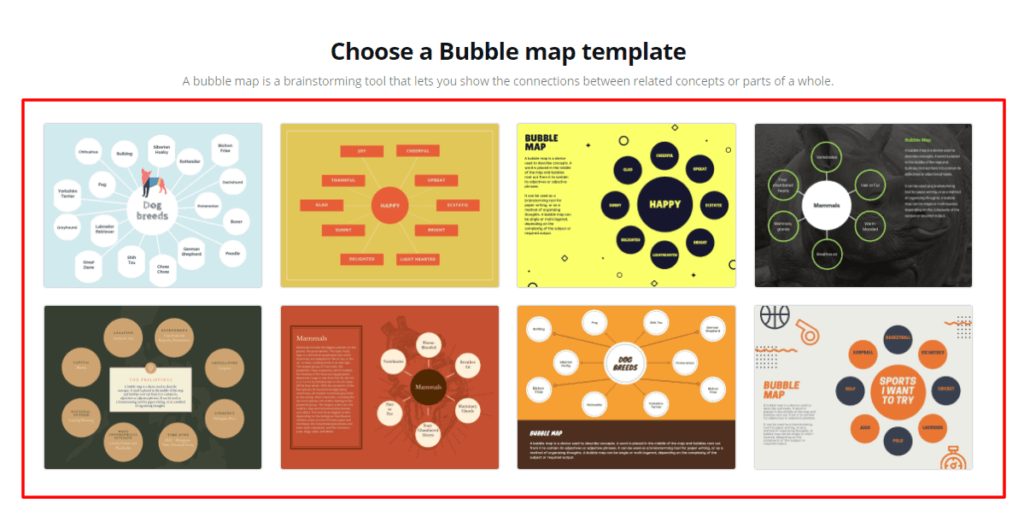
You will find a variety of beautiful graph templates including bar graphs, line graphs, mind maps, pie charts, comparison charts, concept maps, flowcharts, and a lot more!
Tip 32: Save Your Designs as Templates
If you need to work on the same design frequently, you can save them as templates to easily access later.
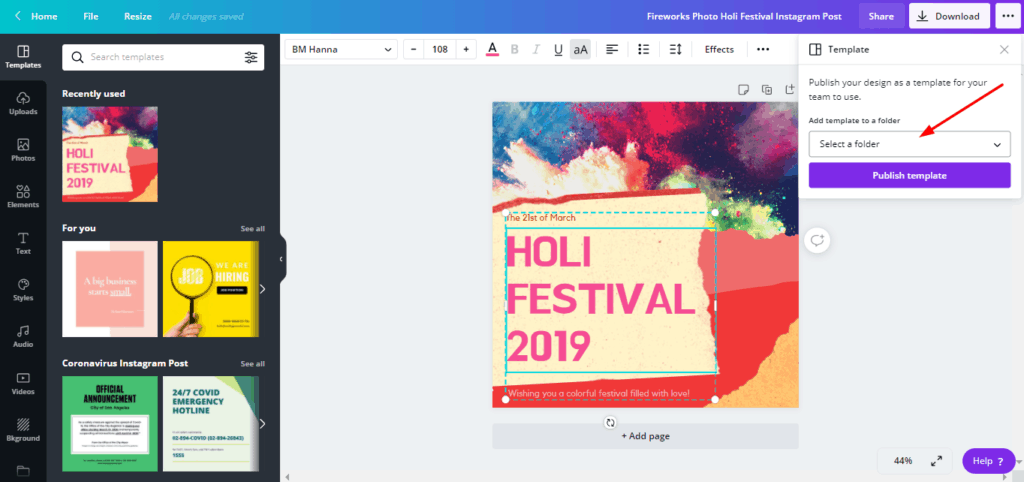
Step 1: After completing your design, select the ‘Template’ option from under the Share tab.
Step 2: Choose a folder where you wish to save it.
Tip 33: Create Attractive Color Combinations With Canva’s Color Palette Generator
Go to Canva’s Color Palette Generator and upload an image of your choice.
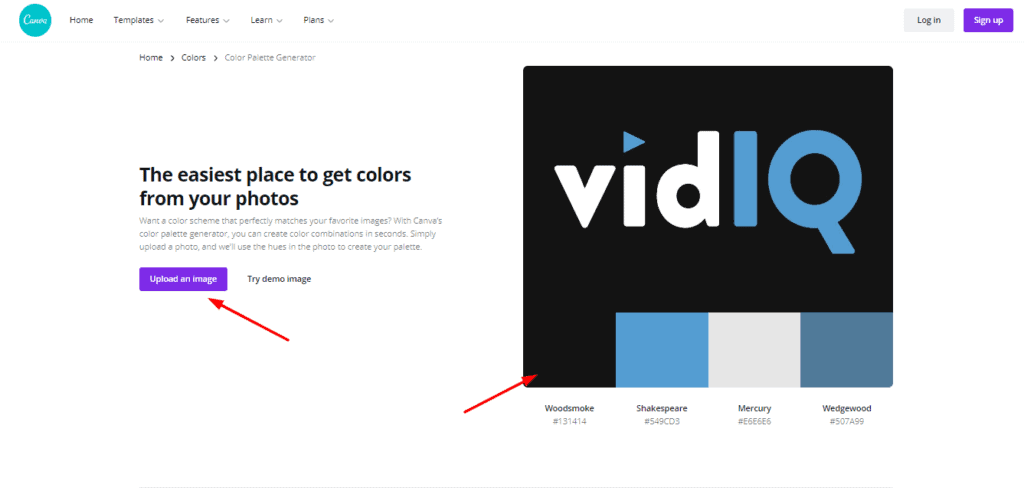
You will get the dominant colors used in that image, along with their hex codes. This is great if you wish to design your home, or your website from a color palette.
Tip 34: Get Color Palette Ideas and Font Combinations
If you want ideas for different color palettes, you can just visit Canva’s Color Palettes, add any keyword, and find lots of different templates to choose from.
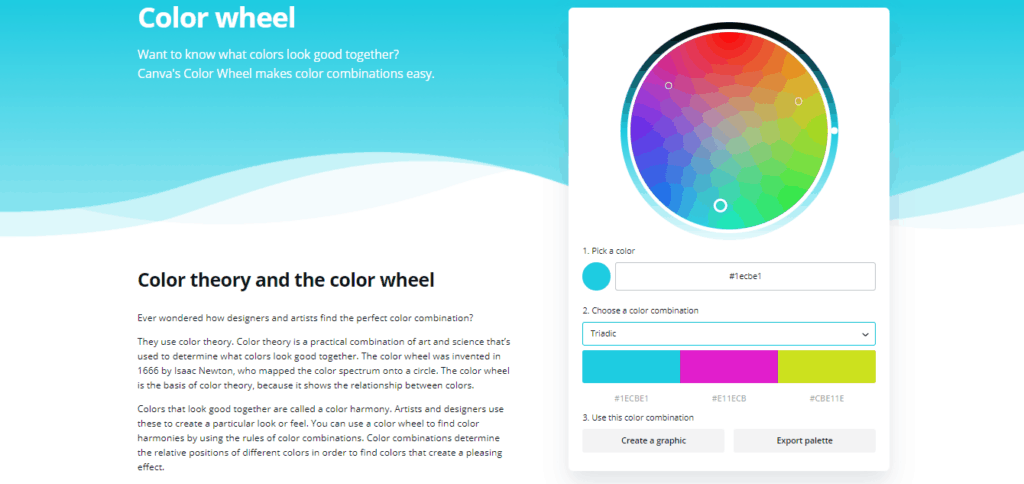
You can also use Canva’s Color Wheel, which is an interactive tool, to decide different color combinations and either export them or create a graphic with them.
Additionally, Canva Font Combinations can help youl find great font pairing recommendations, so you can give it a try!
Tip 35: Use Pre-Designed Color and Font Combinations
Confused with pairing different colors and fonts together? Try the Styles tab in Canva.
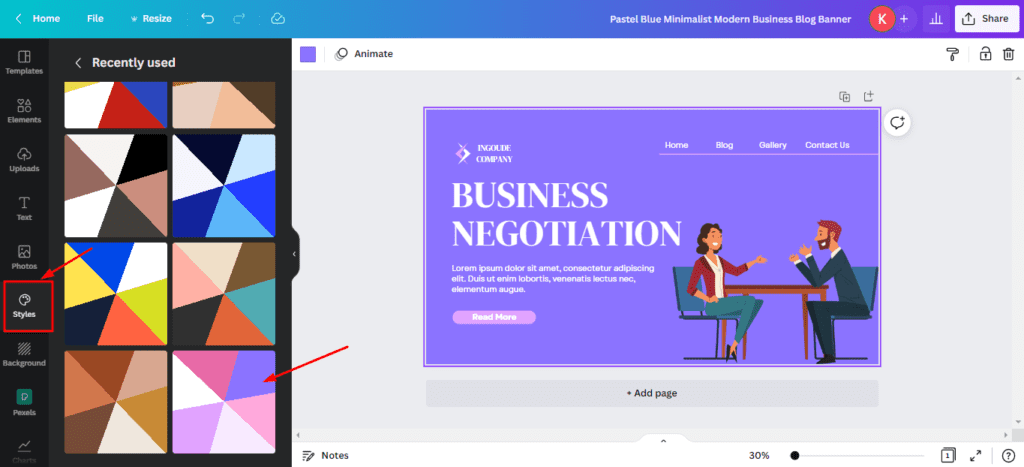
It has pre- designed palettes that offer attractive color combinations for your design. Colors and fonts can be applied with a single click.
Tip 36: Select Colors with Color Eyedropper Tool
You don’t need to download any extensions to pick colors anymore! With the eyedropper tool of Canva Pro, it’s easier than ever to select any color on your design and use it somewhere else.
Here’s how you can do it.
Step 1: Click the color palette icon on the element of your choice.
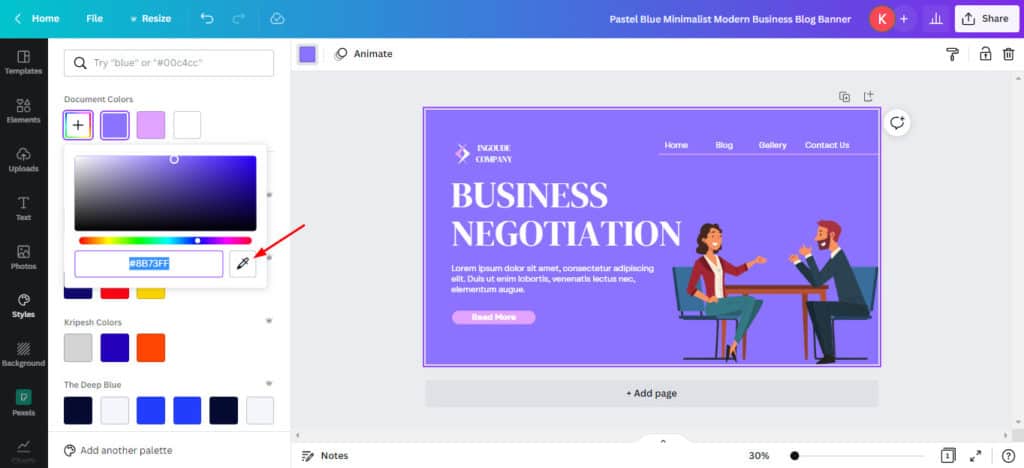
Step 2: On the Document Colors tab, click on ‘Add a new color’.
Step 3: Besides the Hex code, you’ll find the Eyedropper tool. Click on it and select any color from the screen.
Tip 37: Import and Edit PDF Files
Do you know that you can import your PDF files in the Canva editor? And not just that, once the PDF file is imported, you can make as many edits to it as you want! Let’s see how you can do that.
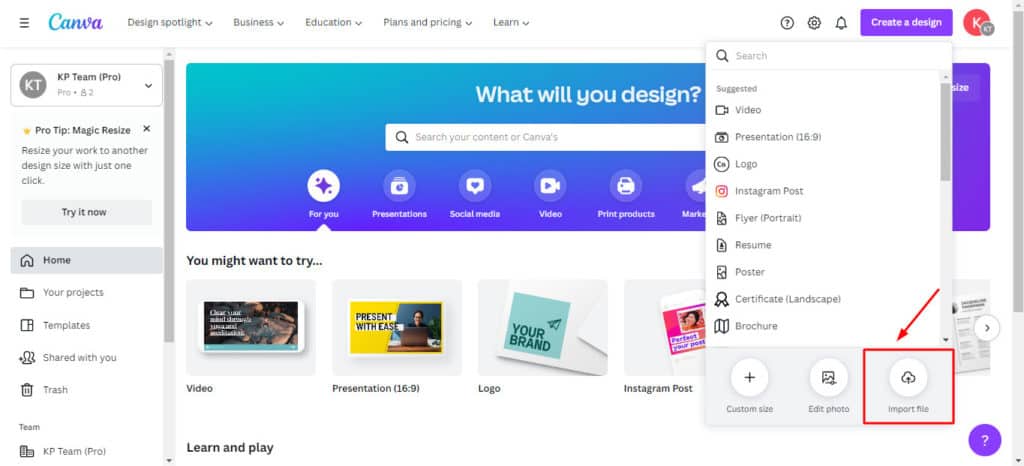
Step 1: On the Canva home page, click on ‘Create a new design’ and select the ‘Import file’ option.
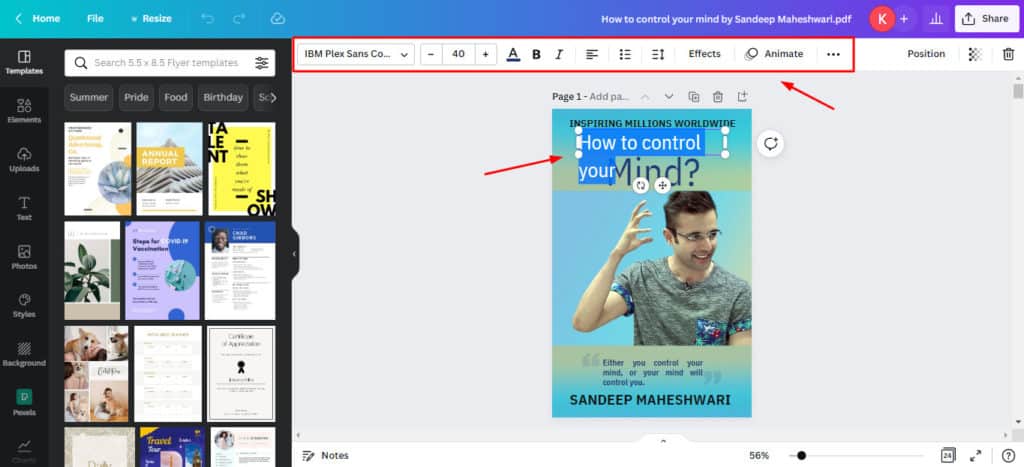
Step 2: Import your PDF file. It’ll open up in the Canva editor and now you can edit it easily.
Tip 38: Blurring the Background of an Image
Blurring the background of any image is a cakewalk with the Canva Pro version. All you need to do is:
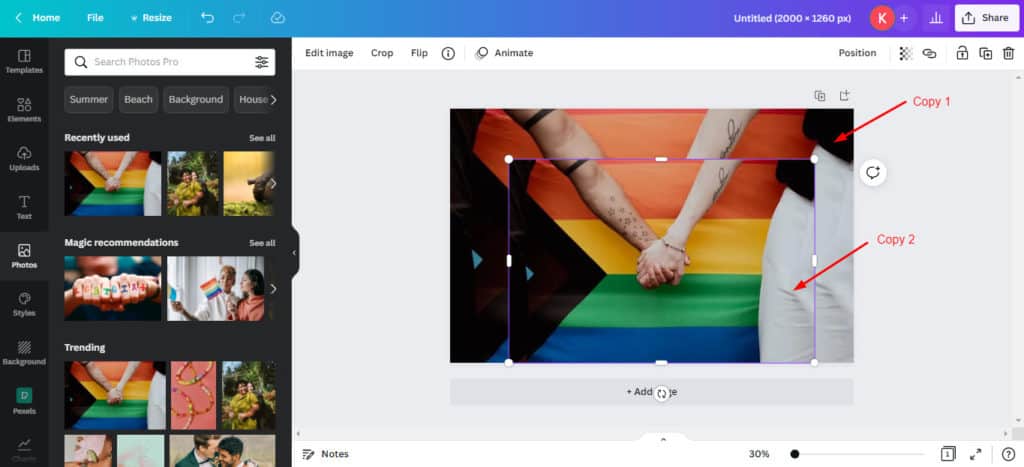
Step 1: Create two copies of the image that you wish to blur in the background.
Step 2: Use the Background Remover tool on the first image and use the blur effect on the second one.
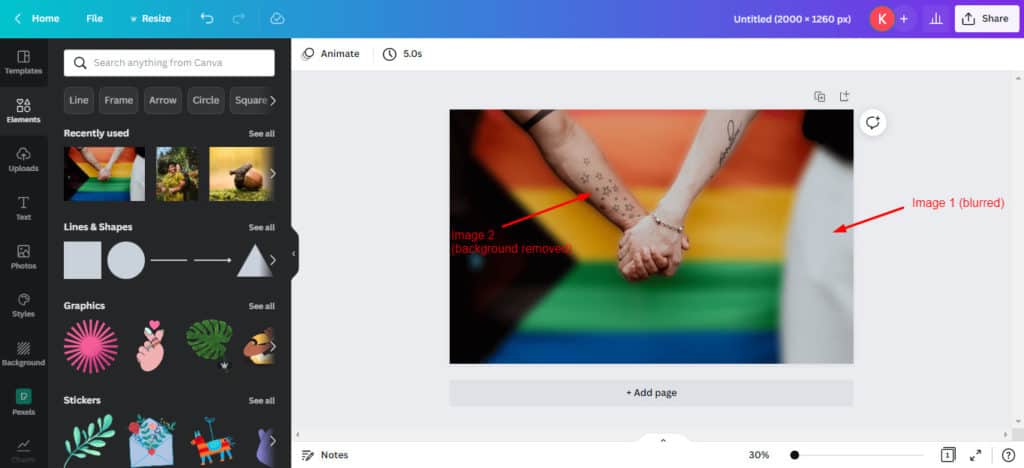
Step 3: Now place the first image over the second one. You have applied the blur effect successfully!
Tip 39: Text Masking with Alphabet Frames
Want to create a unique and highly engaging design? Text Masking is one of the best ways to do that! You can mask your letter frames in Canva with this simple process.
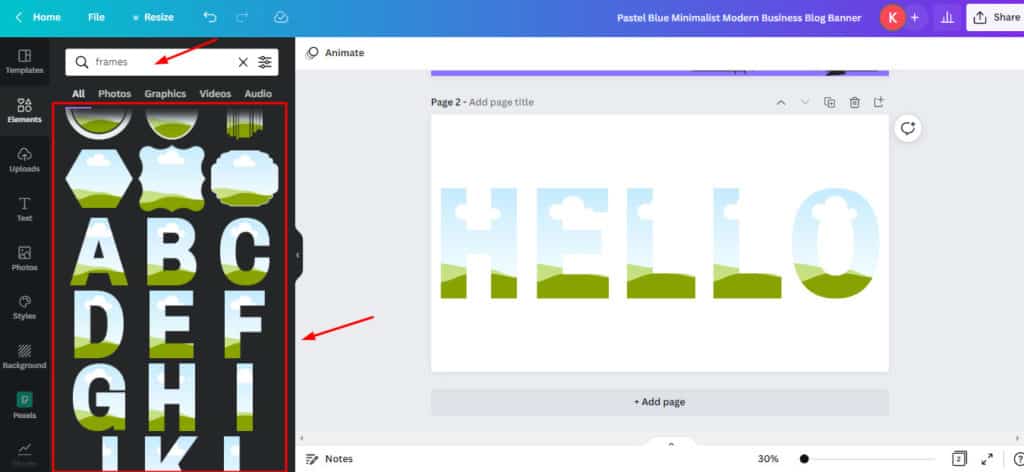
Step 1: Select the letter frames of your choice from the Canva Elements tab by searching for ‘Frames’. Then arrange them according to your choice.

Step 2: Drag and drop videos or photos within them. For example, here, I have used the floral themed videos on my frames.
Tip 40: Converting Photos into Paintings
Yes, with Canva, you can easily transform your images into a painting. Let’s see how to do it.
Step 1: Upload an image on the Canva editor and click on Edit image.
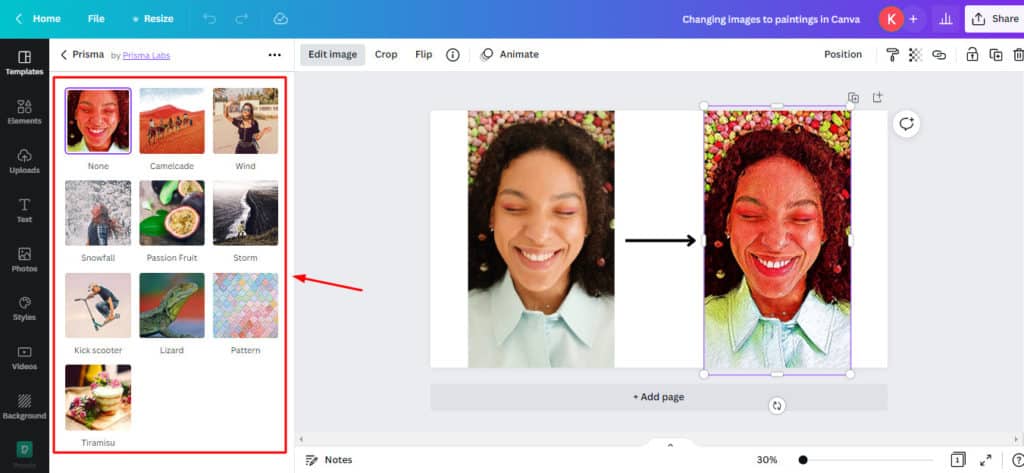
Step 2: Choose the ‘Prisma‘ effect from the list. Try out all the 10 variations of the painting styles and select the one that you like best. This effect will add a punch of creativity to your boring pictures!
Tip 41: Create Magic Design Templates
Creating cool designs for your social media and creative projects just got easier! With Canva’s Magic Design tool, you can select any design template and create customized designs within seconds.
All you have to do is check out the Canva Magic Design tool and select any template of your choice. For instance, I have selected YouTube templates.
Right on top of the templates, you can check out the ‘Try Magic Design’ banner. Simply upload an image you want in your template and it will design the template accordingly!
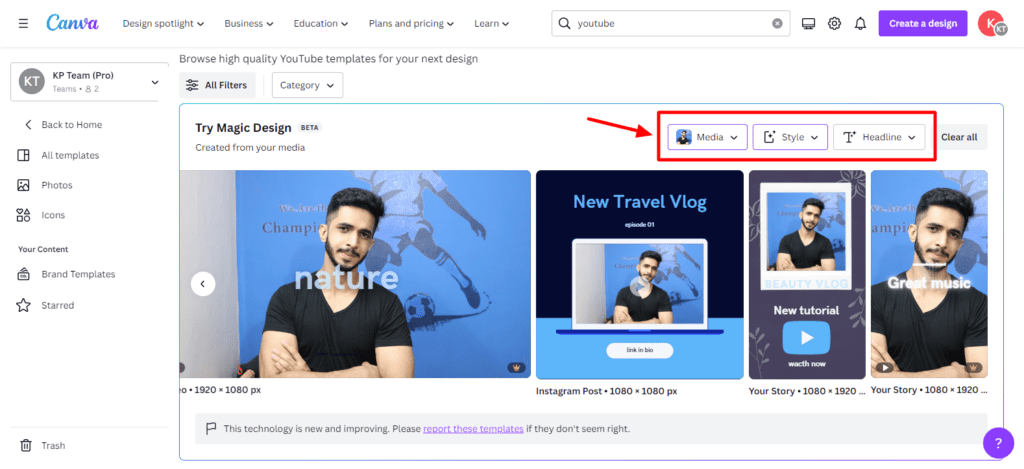
You can even edit the style and headline of the generated templates before customizing them in the Canva editor.
Another solid use case of the Magic Design tool is to create presentations! Whether you’re a school or college student or a business professional, this is one of the quickest ways to design a full-fledged presentation on any topic!
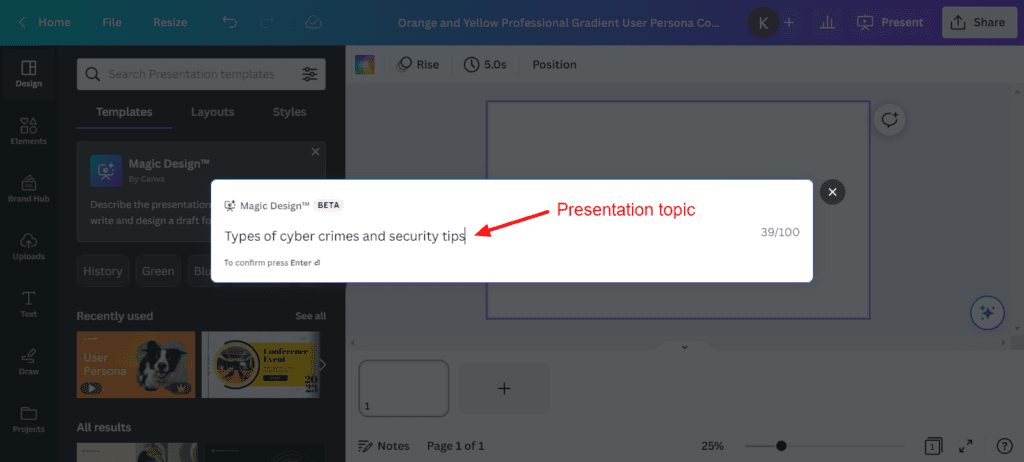
Step 1: Select a blank presentation and head over to the editor.
Step 2: Click on the magic design box on top of the templates tab.
Step 3: Enter the topic of your presentation and watch the magic unfold!
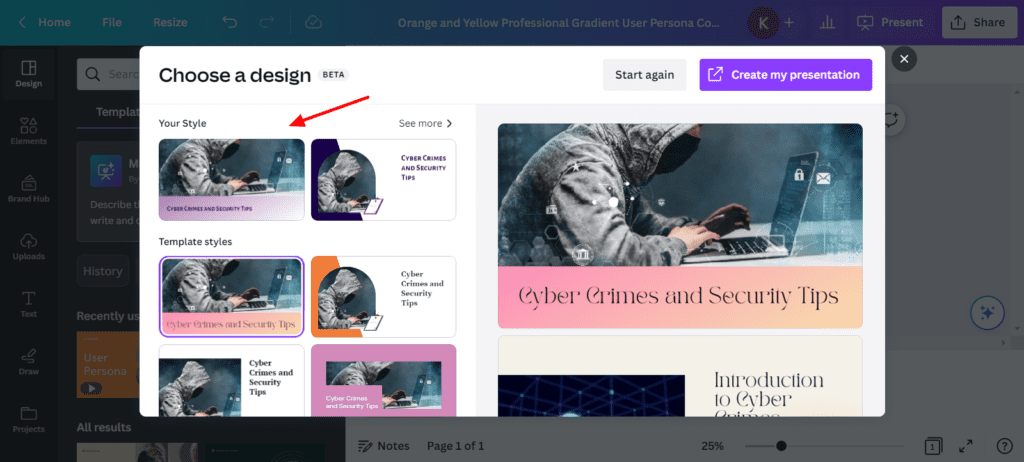
It automatically generates relevant content and appropriate designs for your topic. I find this super cool!
Tip 42: Erase any Element with Magic Eraser
If you find any unwanted elements in your images, you can now erase them with the Magic Eraser tool. Let’s see how to do that.
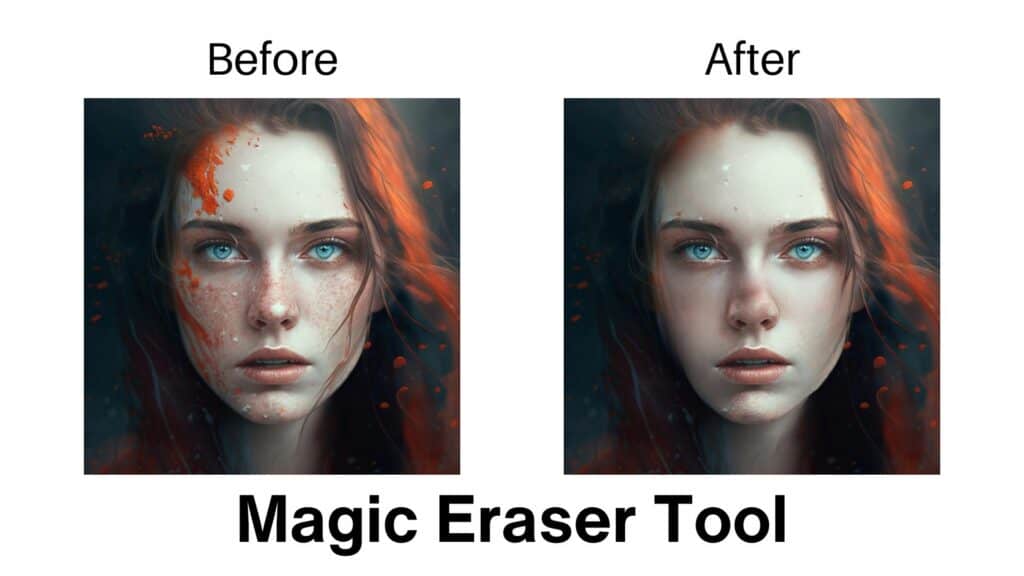
Step 1: Select the image you want to edit and click on Edit Photo.
Step 2: Click on the Effects tab. You’ll find the Magic Eraser under Tools.
Step 3: Select a brush size and cover the area you want to erase.
It will erase the element and blend the area according to its surroundings. I personally love this feature a lot! It is available on Canva Pro only. So make sure you have the Pro plan if you want to use this tool.
Tip 43: Insert Custom Elements with Magic Edit
Ever wanted to add custom elements to your Canva designs? Well, guess what? You can do that even on Canva’s free plan! It lets you add any random elements to your designs. Let’s see how.
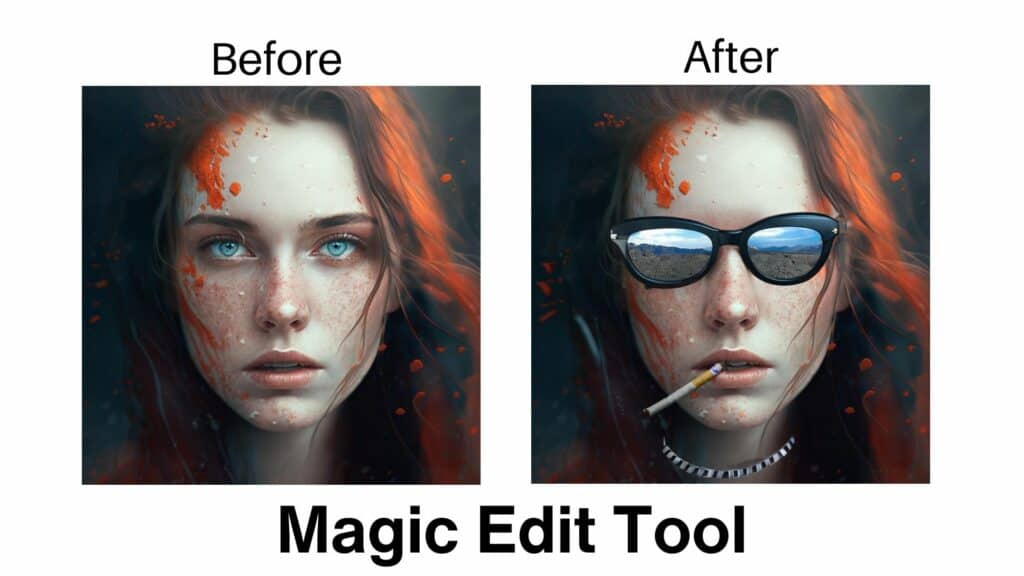
Step 1: Select the image you want to edit and click on Edit Photo.
Step 2: Click on the Effects tab. You’ll find the Magic Edit under Tools.
Step 3: Select a brush size and mark the area you want to replace with the element.
Step 4: Now, describe the element you wish to insert. For instance, flowers, sunglasses, stars, lamps, etc.
It will display different variants of the element and you can insert your favorite one into your photo! I personally found the results generated by this tool quite impressive!
Tip 44: Make your Pictures Color Pop
This is another super cool Canva tool that you can use to make the colors in your images pop! It’ll focus all the attention on the main character in the image. Let’s check how to do that.
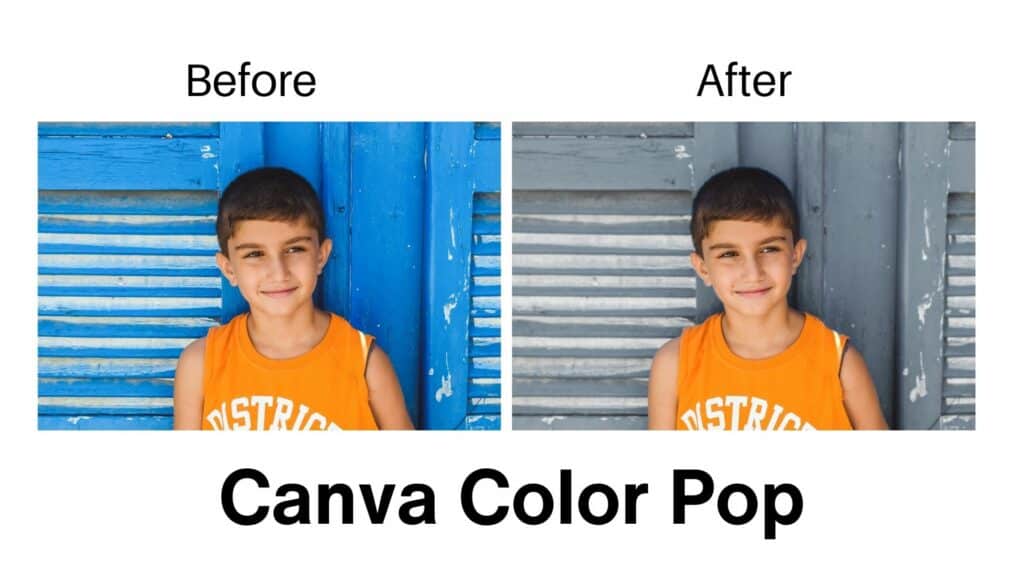
Step 1: Select the image you want to edit and click on Edit Photo.
Step 2: Click on the Adjust tab. Under the Select Area drop-down menu, pick the Background option.
Step 3: Now, scroll down to the color and texture settings. Lower the vibrance and saturation by a significant amount. Your focus character will instantly pop out!
Step 4: If you want to go the extra mile, also dial down the sharpness to create a blur effect in the background.
Look at how catchy the final image looks!
Tip 45: Generate Engaging Content with Magic Write
This is one of my favorite tools on Canva. Just like Google Docs, now you can create engaging content using Canva Docs as well!
Canva’s new Magic Write feature is an AI content generator that can help you draft your content and brainstorm new ideas.
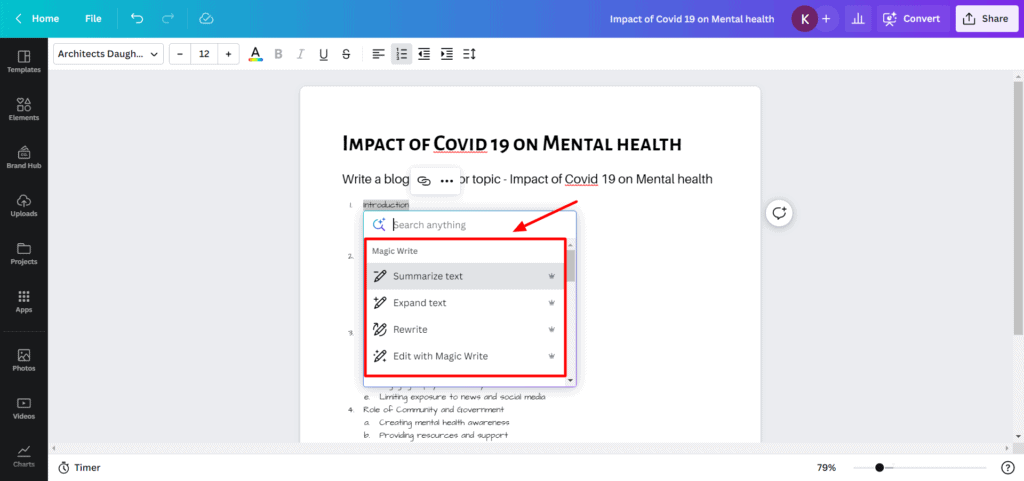
Step 1: Go to the Canva Magic Write tool and click on ‘Try Magic Write’.
Step 2: Canva Docs will open up on your screen. Now, click on the + sign and select Magic Write.
Step 3: Next, you can enter any instruction and it will generate relevant results for you. You can also access additional options like Expand, Rephrase, or create full-length blog posts with this tool!
This tool is accessible on both Canva Free and Pro versions. The number of queries available is as follows:
- Canva Free: 25 queries
- Canva Pro: 250 queries
Tip 46: Personalize your Designs with Hand Drawings
Ever wanted to draw over your Canva designs? Well, that is now possible with the Draw tool. It’s integrated into the Canva editor.
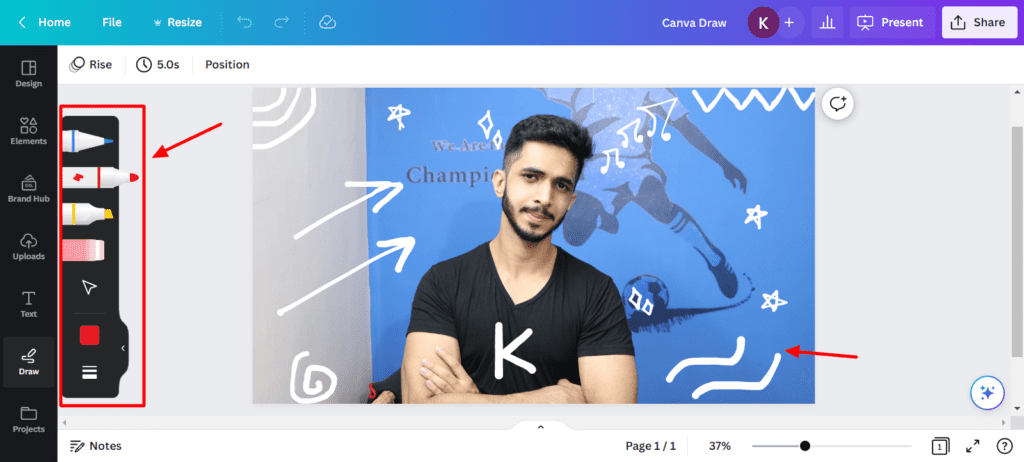
So, when you click on the Draw button, it activates various types of pens and brushes that you can use on your image. It also lets you select the brush’s thickness and color. Cool, isn’t it?
Tip 47: Translate Content into Different Languages
With Canva’s new AI features, you can translate the text on your designs into any language of your choice! This is extremely helpful for social banners, presentations, etc.
All you need to do is visit the Apps section on the left panel and search for the Translate tool. Next, you can select the languages and it’ll translate your design within seconds.
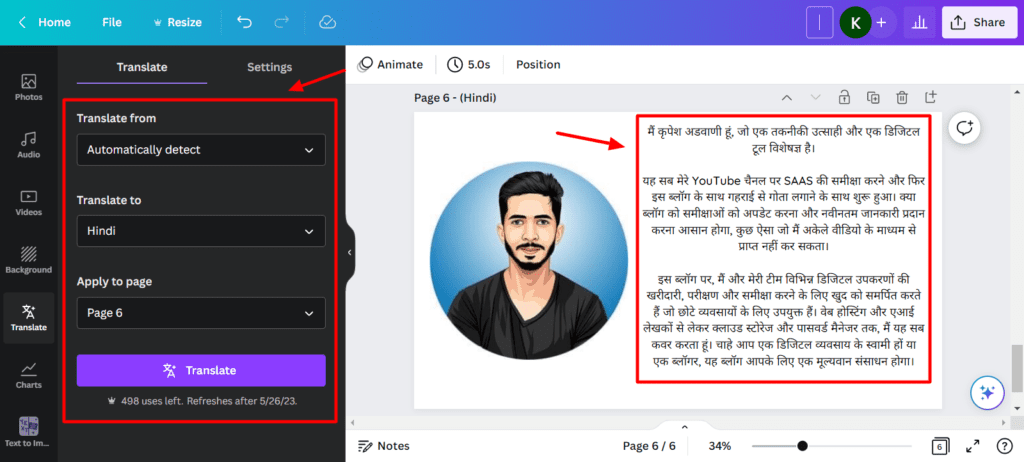
For instance, the above image shows how it translated the content on my About Me page from English to Hindi language. This feature is available to both free and Pro plan users with the following restrictions.
- Free Users: 50 pages/month
- Pro Users: 500 pages/month
Tip 48: Sync Music Beats with Video
If you’re not much of a video editor, this tool is definitely for you! This tool lets you adjust and sync the beats of your audio track to the transitions in your video.
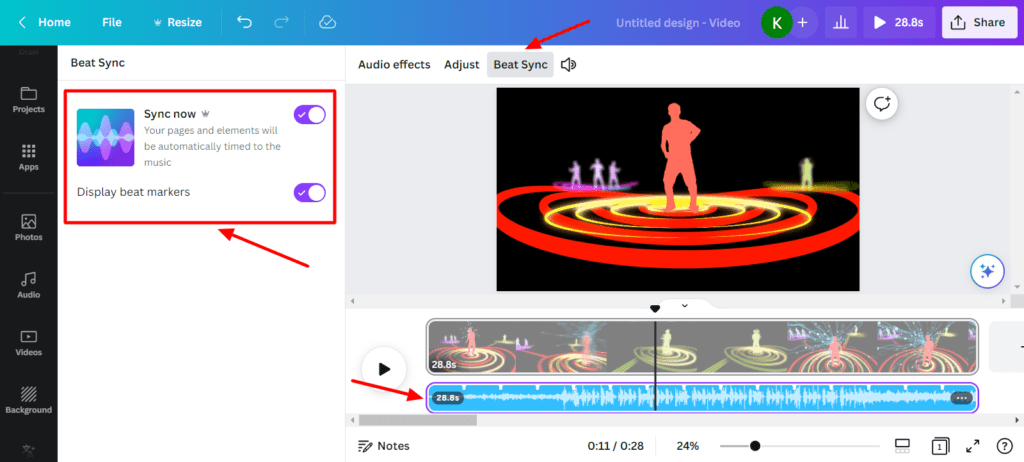
All you need to do is select your audio track and hit the Beat Sync option. It’s a convenient feature for beginners but I think it needs a little more refinement. I personally prefer offline video editing software for tweaking minute details. This feature is only available to Canva Pro users.
Tip 49: Convert Text into AI Images
Canva has also integrated AI Art functionality into its editor. This would be really helpful for bloggers, video editors, social media managers, and creatives. This tool is available under the Apps as ‘Text to Image’.
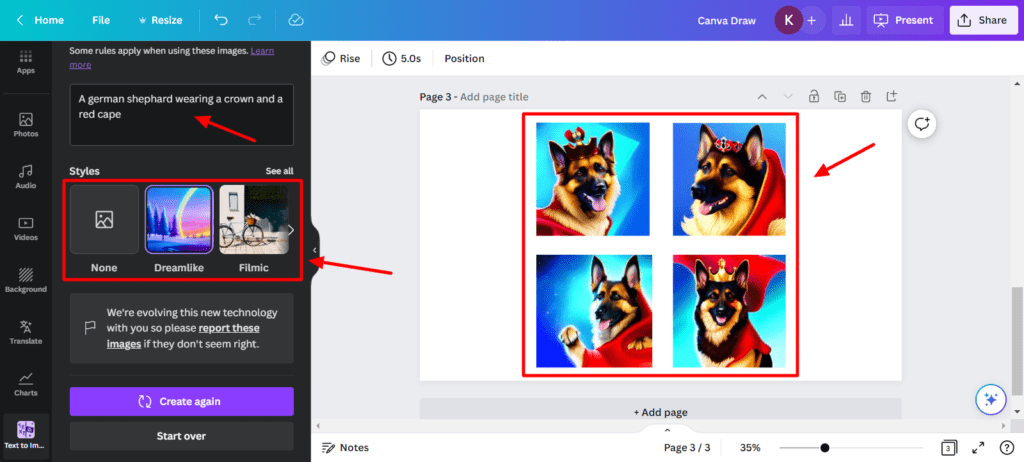
All you need to do is supply your prompt, select a style and aspect ratio, and it will generate relevant AI images for you.
I personally found these images pretty decent, but not the best. You can check out my blog post to understand what is AI Art and how you can generate powerful and accurate AI images.
Tip 50: Replace Elements in Bulk
With Canva’s AI Replace feature, you can replace a specific element used across all your designs with a single click. You simply need to head over to the Brand Hub and select any image you wish to replace. You will find the ‘Replace Across Designs’ option on the drop-down menu.
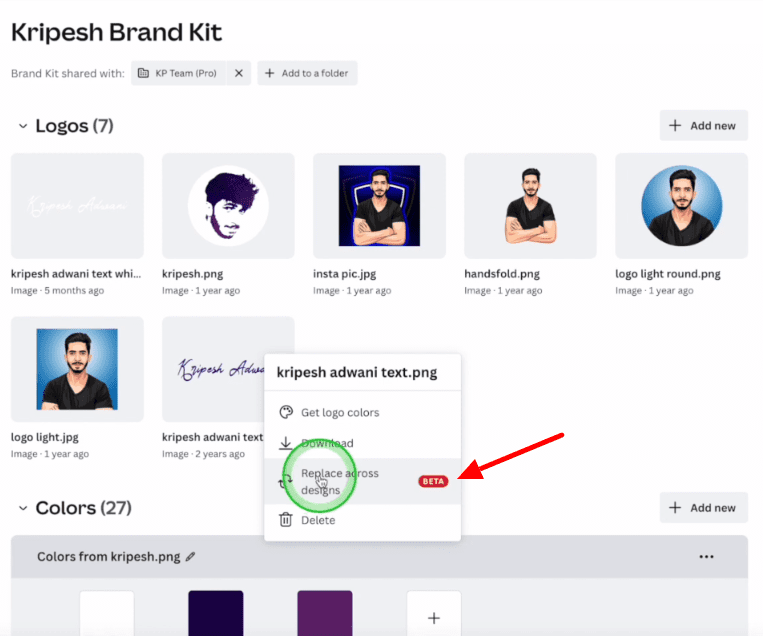
Once selected, it will display a list of all the images using that design and you can select the images that need to be replaced with a new element. It’s a great feature and I think it’ll work best for updating your logos or branding assets.
Tip 51: Add New Fonts
Canva has now partnered with Monotype to provide you with over 1100+ Monotype fonts! These include popular fonts like Northwell, Helvetica, Gotham, Recoleta, Sabon, and more.
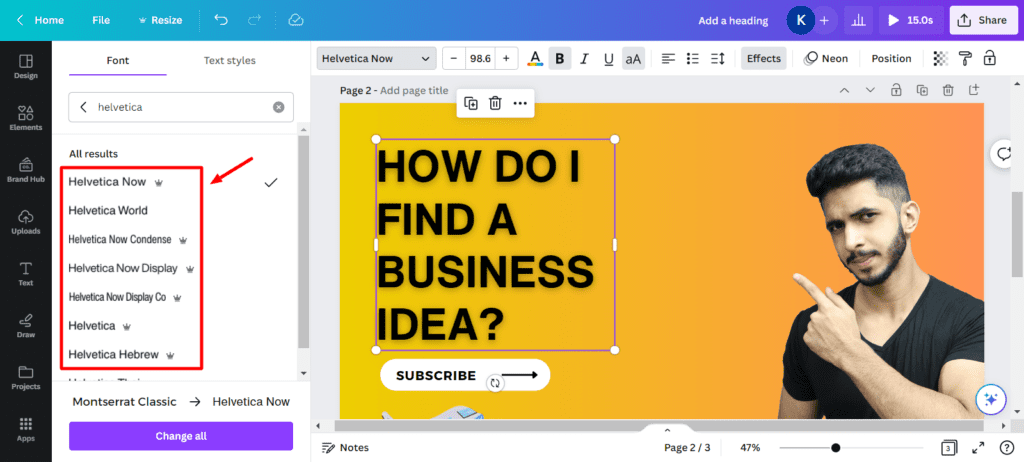
Most of these fonts are exclusively available on Canva Pro. But you can find limited ones on the free plan as well. This is great for designers and creatives who need an advanced font collection.
Conclusion
With this, we have reached the end of our article. I hope this article helped you discover some new Canva hacks and shortcuts.
I hope this helps you use Canva more effectively from now onwards! If you’re interested in discovering more about it, you can check out my detailed Canva Pro Review.
If you enjoyed reading, and wish to stay updated with more such interesting content, you can subscribe to my Newsletter. I’ll make sure to provide you informative content regularly!
Anyway, this is Kripesh signing off! Take care, guys. I’ll be back with another article soon. 🙂

amazing post
Thanks
I am so glad you shared this information. It is very helpful for me.
Learnt so many tricks. Though I’m using Canva, some of these were new to me.
Glad this was useful for you.
The post was indeed helpful. Keep up the good work!!
Glad you liked it 🙂